


CQRS with .NET and AWS
20 Feb 2024One of the most talked about and appreciated patterns in recent years is undoubtedly CQRS: Command-Query Responsibility Segregation. Its potential is offset by implementation complexity, which is too often underestimated in the design phase. Moreover, we too often approach the pattern without a real need, lured by the promise of potential scalability but underestimating its implementation and maintenance costs.
But let’s take a step back and first understand what scenario CQRS proposes to solve and why we decided to talk about it today.
What is CQRS
CQRS is an architectural pattern suitable for developing applications that must provide a high level of scalability while still handling high volumes of traffic and data. The primary use case involves applications that need to handle significantly more read requests than read requests.
The underlying concept is simple: the logical, but not limited to, separation of write requests from read requests. Basically, instead of the usual, single model for all CRUD-type operations, there is the creation of two separate models that are particularly optimized for the different purposes they must serve.
This split allows for a streamlined, simplified model tailored to each specific read operation, leaving the complexity of business logic on the write operations. The end result is a flexible application that allows the two models to scale independently. In this way the two worlds are completely parallel, perfectly designed for their purpose, even going so far as to use two completely separate databases.
In this first article, therefore, we are going to explore the possibilities offered by the AWS cloud to develop a simple solution by applying the CQRS pattern, focusing mainly on the data storage part.
CQRS in Cloud-Native mode with AWS
Let us start by defining the ideal Cloud-Native technology, in our context, to implement the write model. Our requirement is to save an entity or, rather, the state of an aggregate in our storage and notify that this operation was successful and the state of our application has changed. AWS offers several storage technologies, but to take full advantage of the ability to historicize the entire payload, the best choice can only be DynamoDB.
DynamoDB, in fact, is the leading NoSQL storage solution offered by AWS. It is designed to offer high performance, allows for fully automatic scaling, effectively handling large volumes of data while offering low latency. Most importantly, it is relatively inexpensive.
Having chosen the database for the write model, let us now focus on the read model. In the introduction, we described the possibility of using different databases for the two models. For the read model, we need to build an efficient database that can support the different queries that can be performed, and most importantly, scale horizontally where needed, without intervening at the application level. Amazon Aurora responds worthily to these characteristics. It is a MySQL- and PostgreSQL-compatible database that has the attractive feature of an easy replication mechanism.
Finally, we need to define how to transfer data from the write model to the read model. The strategies can be different, but to take full advantage of the Cloud’s capabilities, AWS provides us with an interesting service: DynamoDB Stream. Basically, by enabling DynamoDB Stream on a DynamoDB table, we can generate an event stream to which a Lambda function can then be hooked. The idea then is that, with each write to the table, an event is generated that is in turn captured by a Lambda function.
It will then be the job of the Lambda function to extract the necessary information to create the write pattern and populate the corresponding database.
The diagram below describes the desired architecture of our solution:
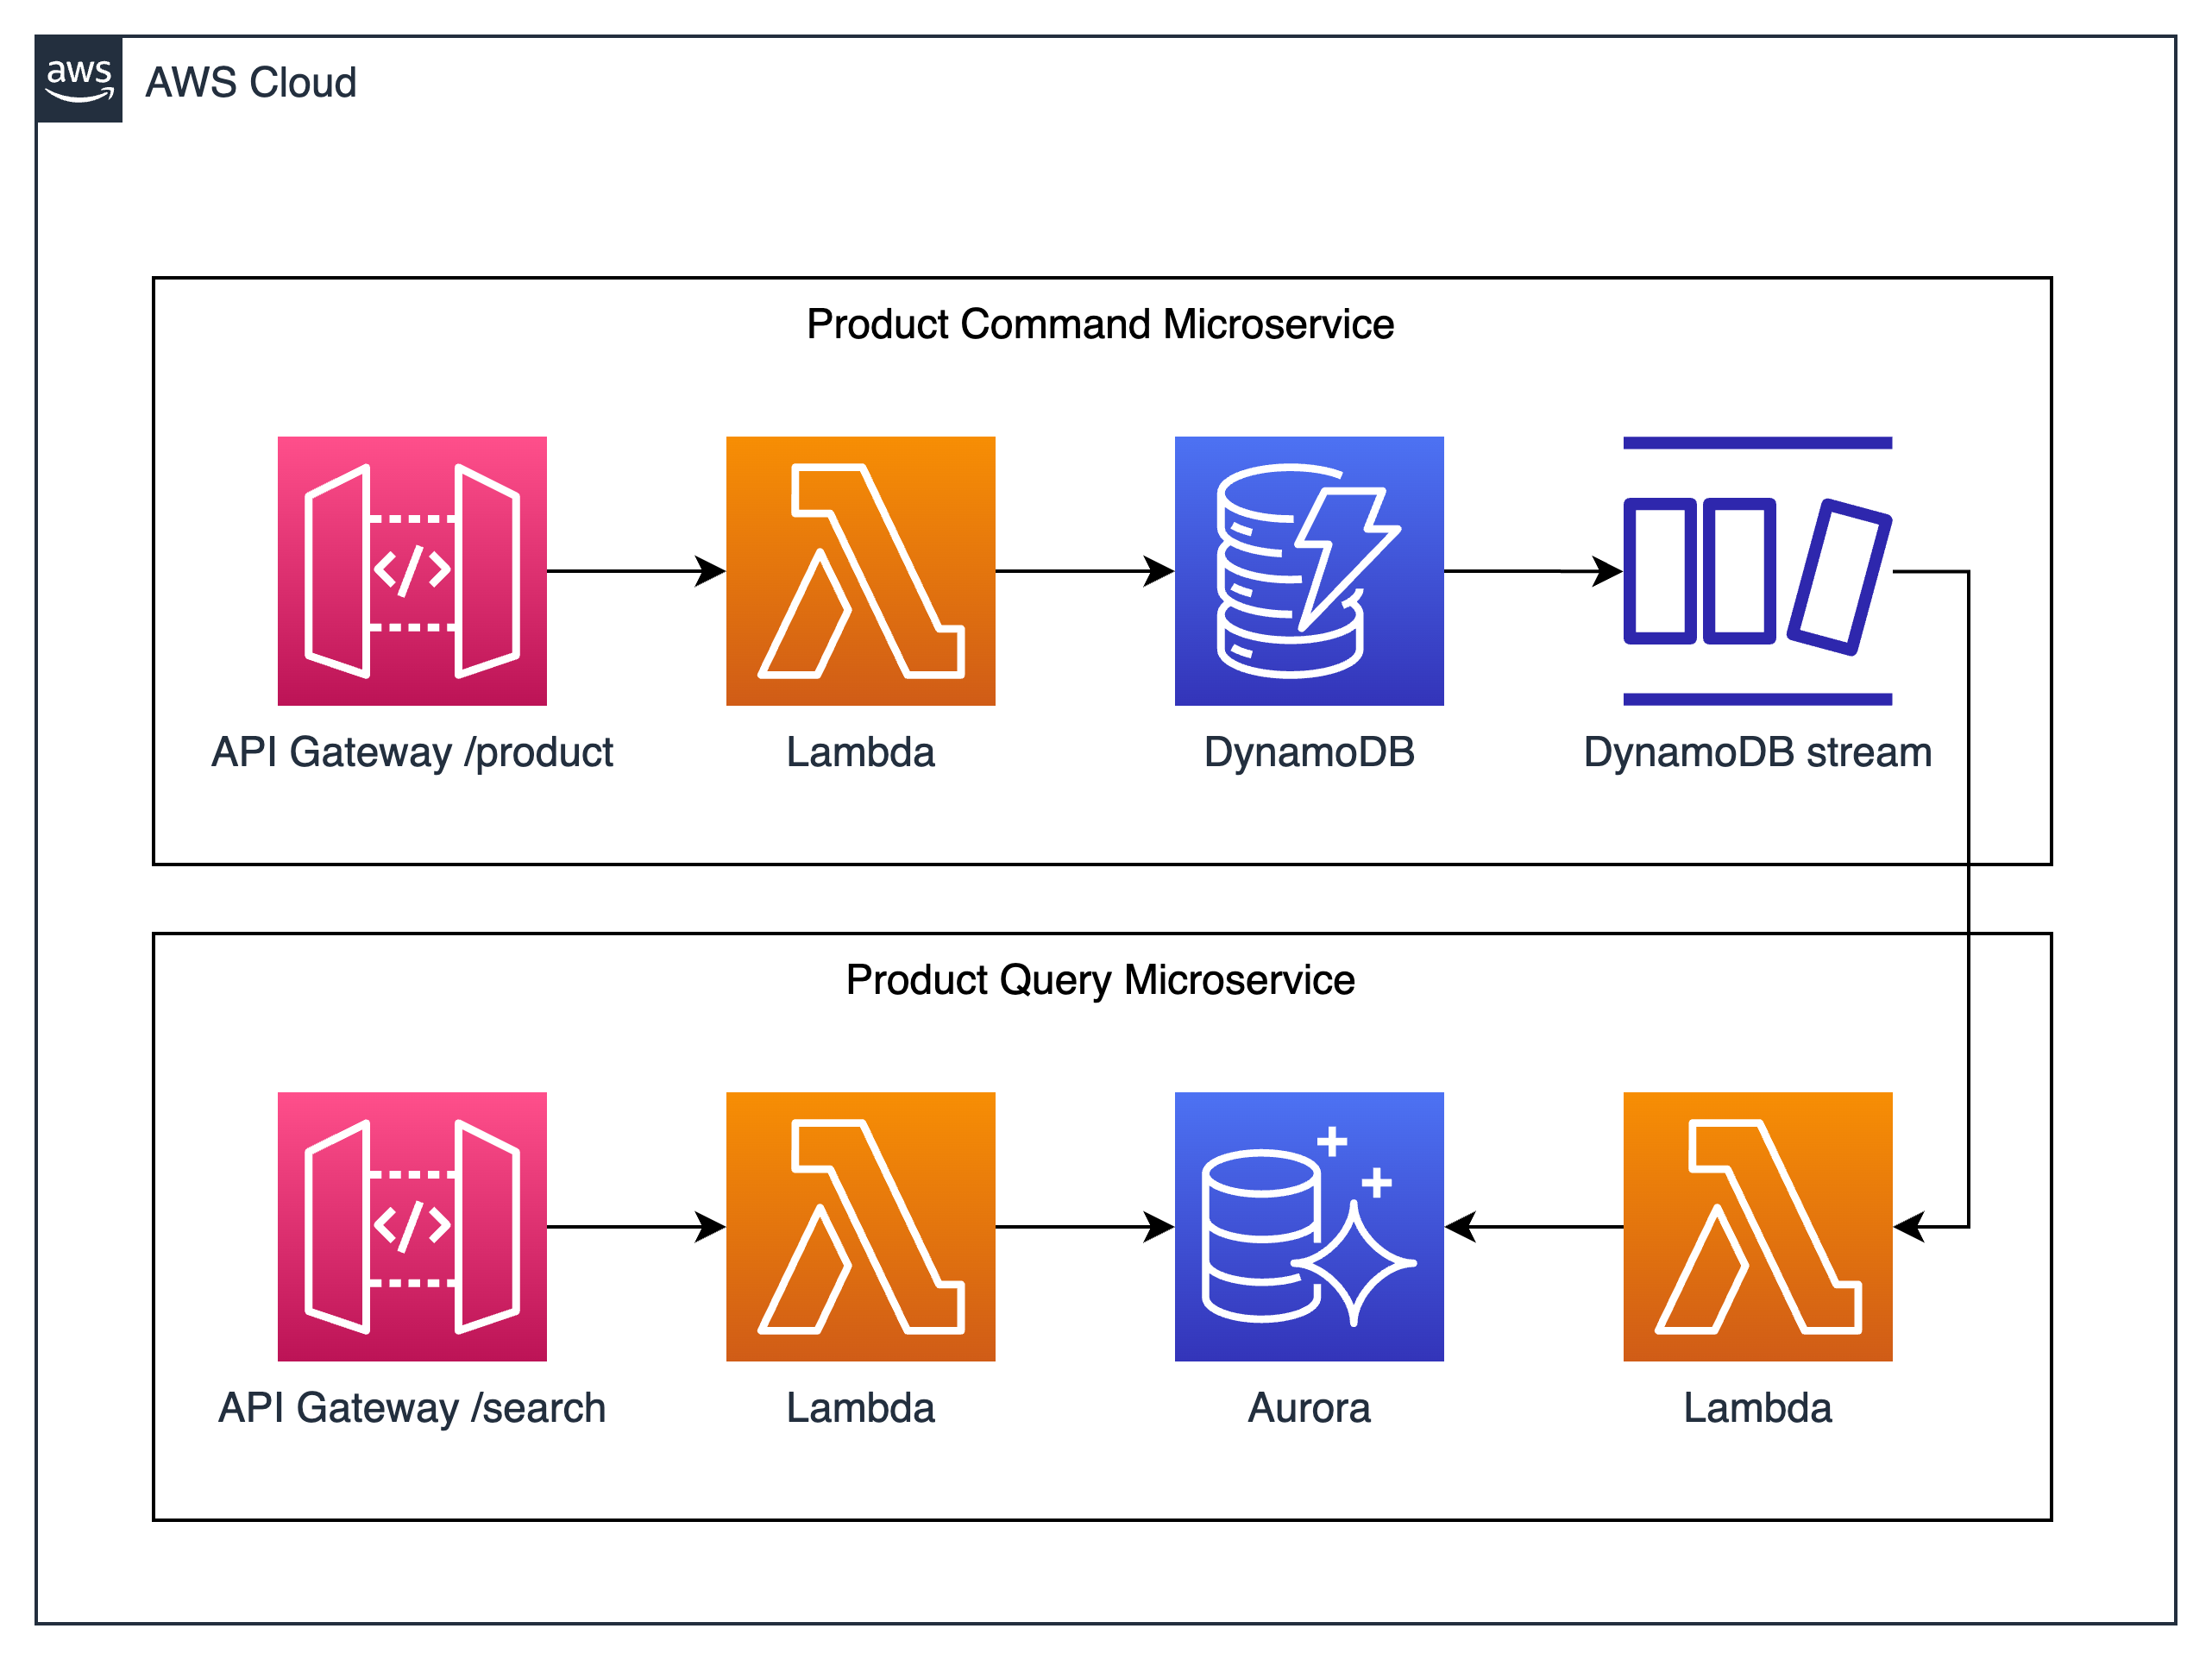
Il nostro modello di scrittura e DynamoDB
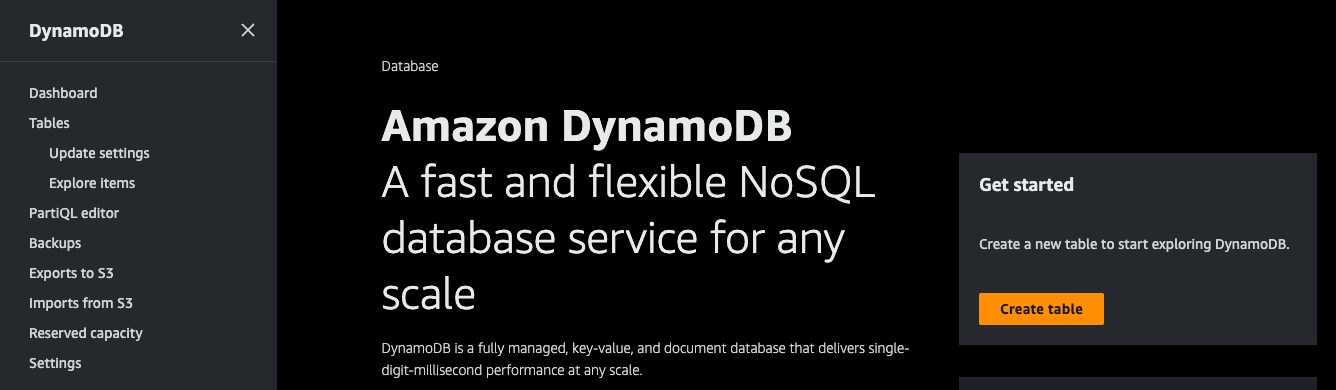
Prerequisite of our solution, as shown in the diagram above, is the creation of a DynamoDB table and an Amazon Aurora database, as well as the development of the necessary AWS Lambda functions. We then start with the creation of the table. We then access the AWS console, and from there the DynamoDB service management page, and click on Create Table:
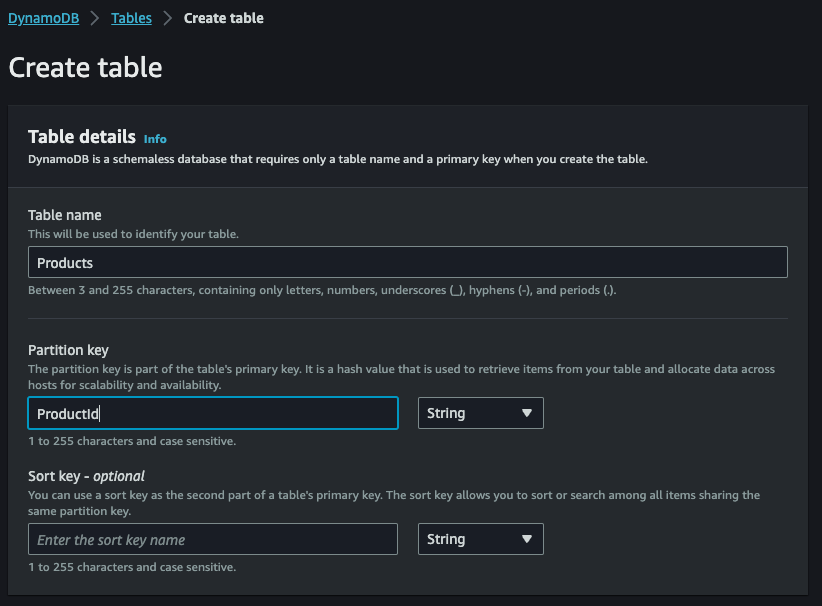
Now we can set table name on Products and Partition key on ProductId, and finally we can click on Create table:
Let us now proceed with writing our AWS Lambda function. If we have not already installed the Amazon Lambda Templates, we use the dotnet command to proceed with the installation:
dotnet new install Amazon.Lambda.Templates
In order to create Lambda functions, we must also proceed with the installation of the .NET Global CLI Tools:
dotnet tool install -g Amazon.Lambda.Tools
Finally we proceed with the creation of the project:
dotnet new lambda.EmptyFunction --name ProductCommandFunction
Within the project, we define our simple model for saving a product:
[DynamoDBTable("Products")]
public class Product
{
    [DynamoDBHashKey]
    public int ProductId { get; set; }

    [DynamoDBProperty]
    public string Name { get; set; }

    [DynamoDBProperty]
    public decimal Price { get; set; }

    [DynamoDBProperty]
    public bool OutOfStock { get; set; }
}
As a result, the Lambda function that does the saving appears to be very simple indeed:
using Amazon.Lambda.Core;
using Amazon.Lambda.Serialization.SystemTextJson;
using Amazon.DynamoDBv2;
using Amazon.DynamoDBv2.DataModel;
using System;
using System.Threading.Tasks;

[assembly: LambdaSerializer(typeof(DefaultLambdaJsonSerializer))]

public class Function
{
    private static AmazonDynamoDBClient _dynamoDbClient;
    private static DynamoDBContext _dbContext;

    static Function()
    {
        AmazonDynamoDBConfig clientConfig = new AmazonDynamoDBConfig
        {
            RegionEndpoint = Amazon.RegionEndpoint.YOUR_REGION
        };

        _dynamoDbClient = new AmazonDynamoDBClient("YourAccessKey", "YourSecretKey", clientConfig);
        _dbContext = new DynamoDBContext(_dynamoDbClient);
    }

    public async Task<string> FunctionHandler(Product inputProduct)
    {
        await _dbContext.SaveAsync(inputProduct);
    }
}
Our writing model and Amazon Aurora
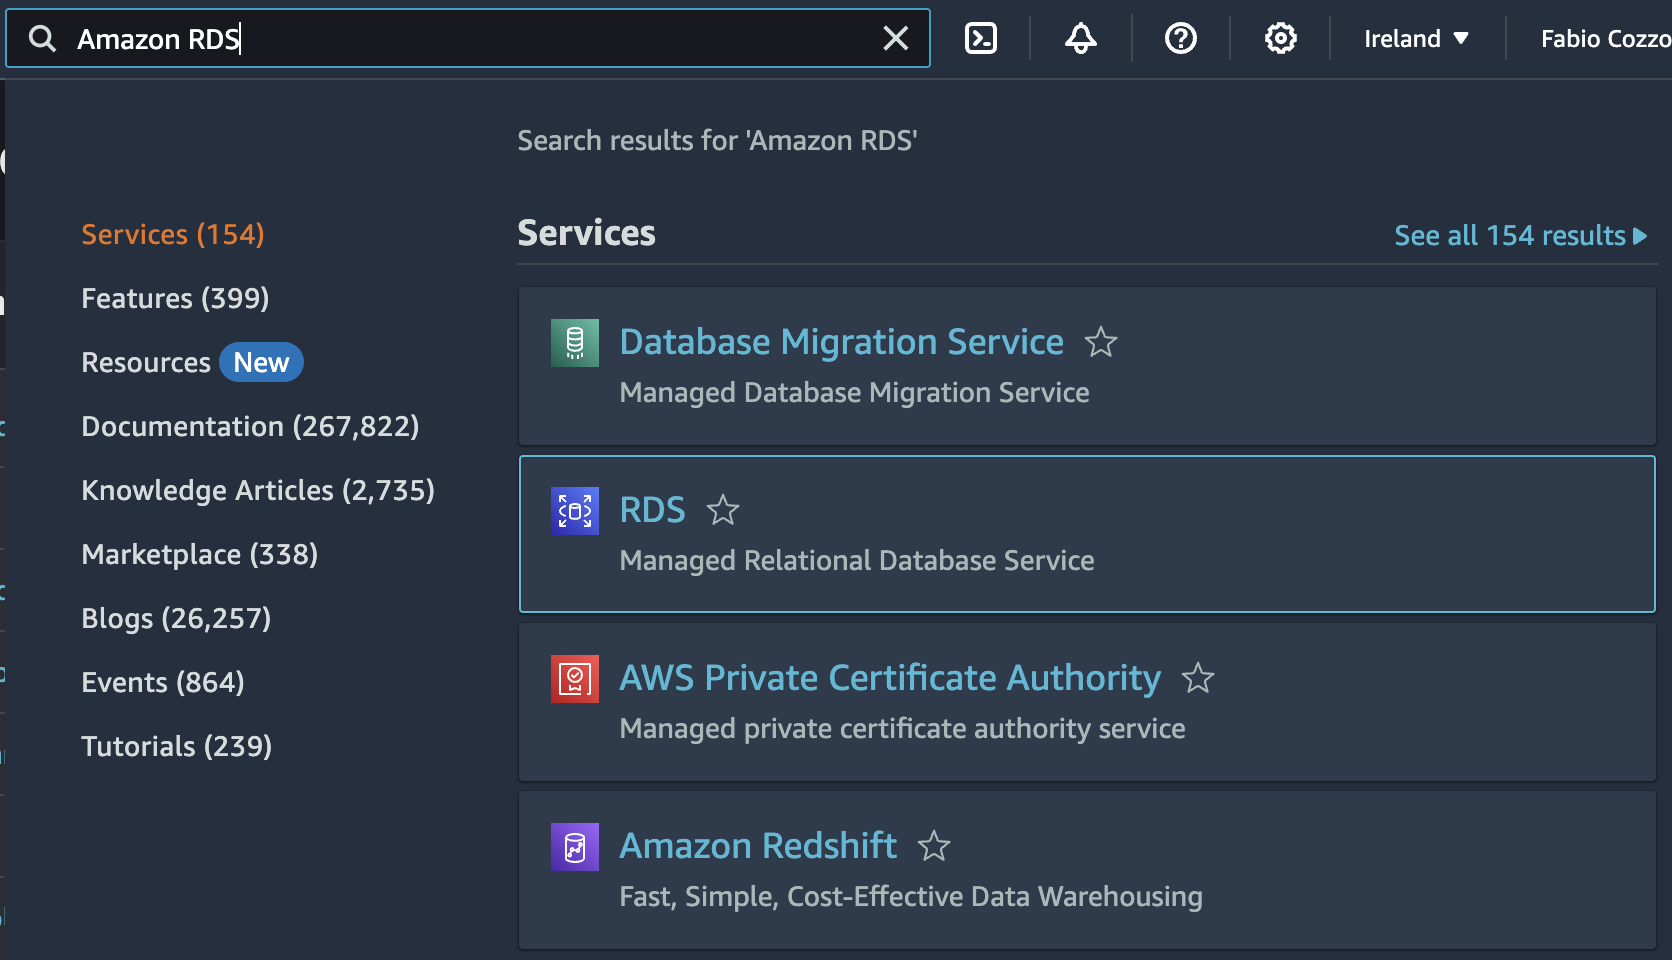
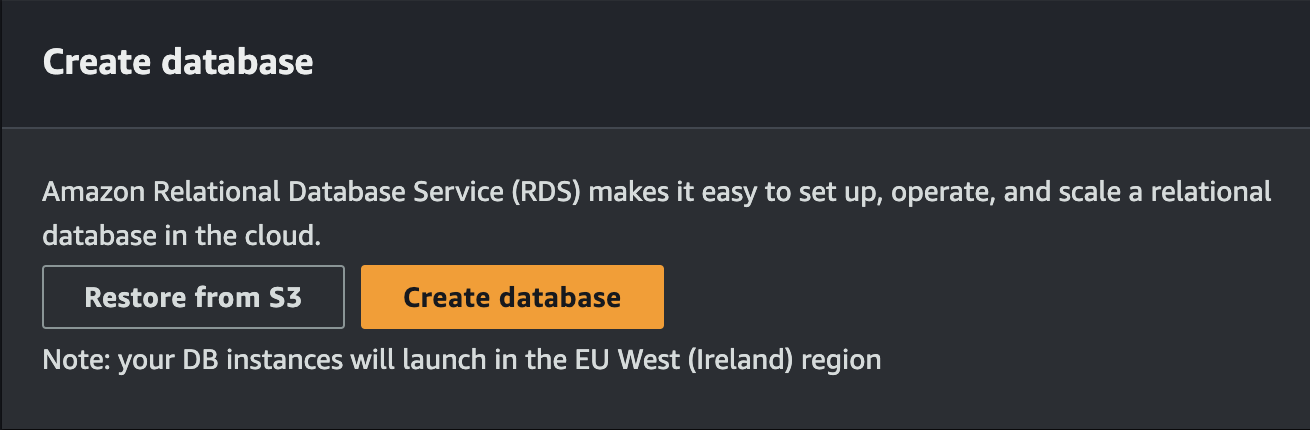
Having created and prepared the read model (Query), we now need to create the Amazon Aurora database that we will use as the basis for the write model (Command). We have already anticipated how Amazon Aurora was the choice. To create it, therefore, we access the AWS console and select Amazon RDS, also simply using the search box, as shown below:
From the Create database section, we click on the defined button to proceed with the creation of our database:
We choose Amazon Aurora as the database engine and the engine we want to use, in our case we opt for compatibility with MySQL:
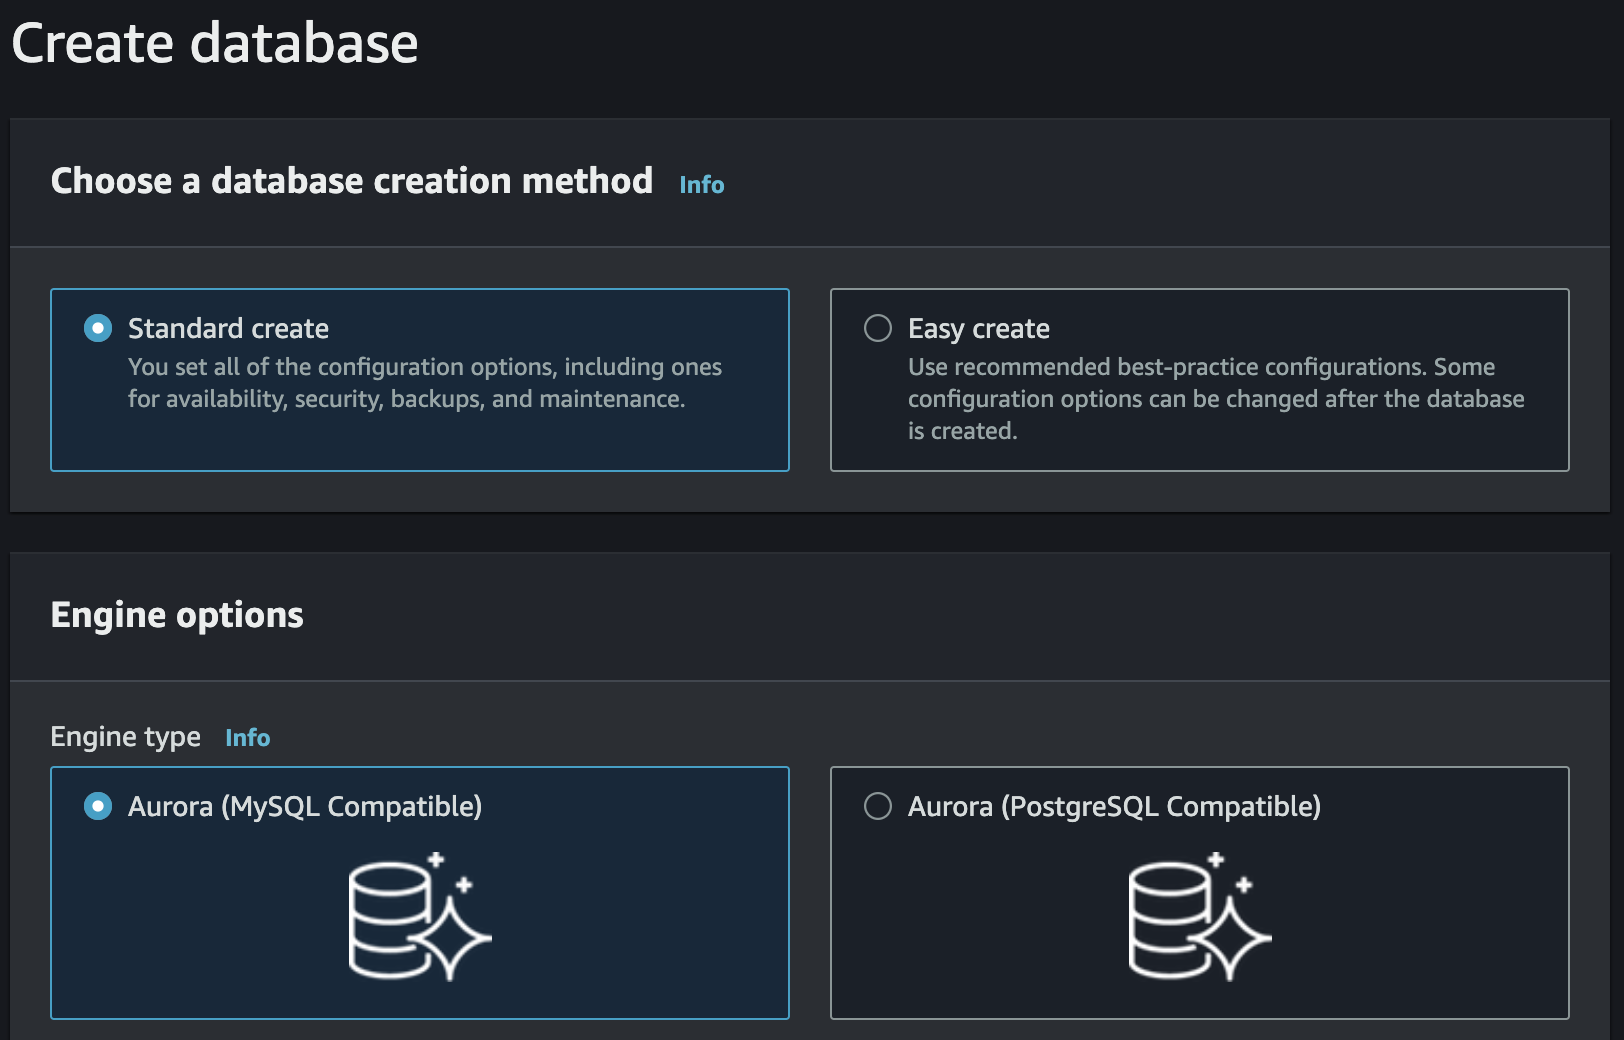
For the purpose of this article, we can leave the default settings and possibly choose a more suitable name to assign to our database.
We then click on Create database to generate our storage. When finished, we will have a situation like the following:

Now our read database, which will simply contain the product list, is ready to be used. The next step is to connect the two databases to generate the read table from the write table. For this, we can take advantage of a native feature of DynamoDB called DynamoDB Stream.
Let’s create our DynamoDB Stream
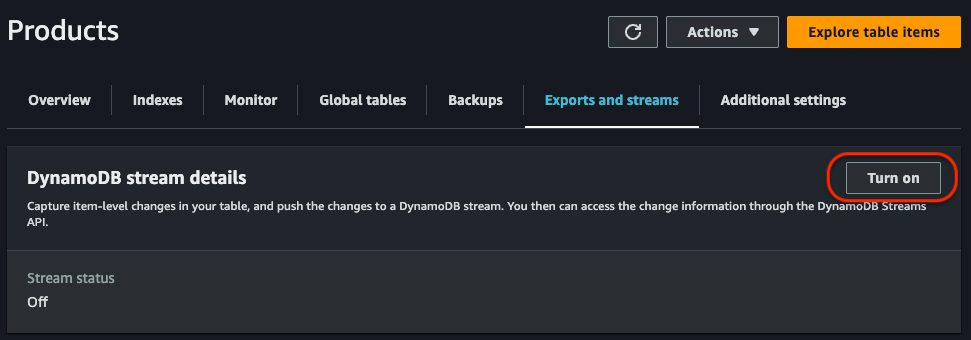
Having created our table in DynamoDB, we must now enable the stream that will then allow us to capture write events and eventually redirect them to a dedicated Lambda function.
But what is a DynamoDB stream? We can define it as a stream of events, sorted by their natural order, generated from operations performed on the table such as insert, modify or delete.
This allows us to intercept what is happening on the DynamoDB table and act accordingly.
We then create our DynamoDB Stream. From the management console, we access our previously created Products table and, in the Exports and streams section, click on the Turn on button at DynamoDB stream details:
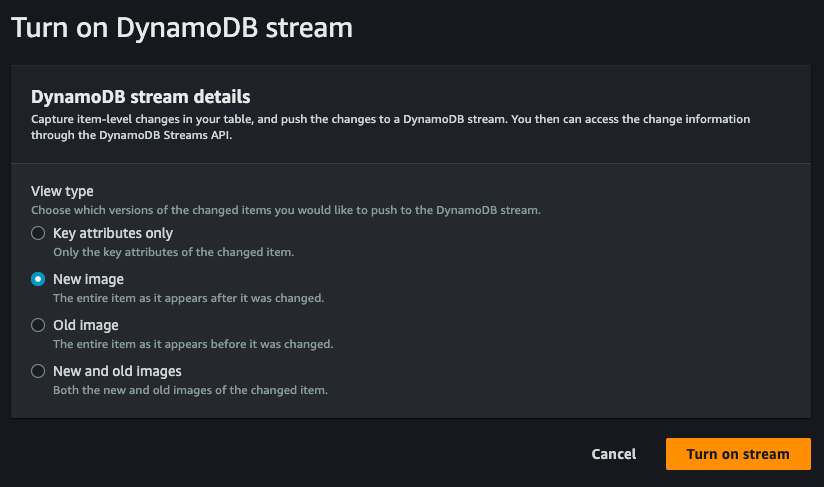
We then select New and old images in order to get the new record directly, as a result of the change made on the database:
At the same time that the DynamoDB stream is enabled, an ARN will also be created, a unique identifier valid within AWS that is needed to locate resources and connect them to each other. It will in fact come in handy in the next step when we go to create the Lambda function that will take care of generating the data in the write tables.
A Lambda function to generate the reading model.
Having set everything up for writing, we now proceed to generate our read model. We then create a new AWS Lambda project
dotnet new lambda.EmptyFunction --name ProductHandlerFunction
The task of this function is relatively simple: handle the insert, edit, and delete events of an item in the DynamoDB Products table and write it to an Amazon Aurora table. To do this, we modify the Function class in the Function.cs file as shown below:
[assembly: LambdaSerializer(typeof(Amazon.Lambda.Serialization.SystemTextJson.DefaultLambdaJsonSerializer))]

public class Function
{
    private readonly string connectionString;

    public Function()
    {
        // Replace these values with your Aurora database connection details
        string serverName = "your-aurora-server-name";
        string dbName = "your-aurora-database-name";
        string username = "your-aurora-username";
        string password = "your-aurora-password";

        connectionString = $"Server={serverName};Database={dbName};User ID={username};Password={password};";
    }

    public void FunctionHandler(DynamoDBEvent dynamoEvent, ILambdaContext context)
    {
        foreach (var record in dynamoEvent.Records)
	      {
            Dictionary<string, AttributeValue> newImage = record.Dynamodb.NewImage;
            if (newImage != null)
            {
                Product product = new Product
                {
                    ProductId = Convert.ToInt32(newImage["ProductId"].N),
                    Name = newImage["Name"].S,
                    Price = Convert.ToDecimal(newImage["Price"].N)
                };

                using (MySqlConnection connection = new MySqlConnection(connectionString))
                {
                    connection.Open();

                    using (MySqlCommand cmd = connection.CreateCommand())
                    {
		                    cmd.CommandText = "INSERT INTO Product (ProductId, Name, Price) VALUES (@ProductId, @Name, @Price)";
		                    cmd.Parameters.AddWithValue("@ProductId", product.ProductId);
		                    cmd.Parameters.AddWithValue("@Name", product.Name);
		                    cmd.Parameters.AddWithValue("@Price", product.Price);

		                    cmd.ExecuteNonQuery();
                    }
                }
            }
        }
    }
}
For the correct execution of the Lambda function, the following packages must be installed:
dotnet add package AWSSDK.Extensions.NETCore.Setup
dotnet add package Newtonsoft.Json
dotnet add package MySql.Data
dotnet add package AWSSDK.DynamoDBv2
dotnet add package Amazon.Lambda.DynamoDBEvents
Having finished the development of our Lambda function, we can now publish it to AWS, as we saw earlier, with the command:
dotnet lambda deploy-function ProductHandlerFunction
After choosing an appropriate name for the IAM role, we select option 2 AWSLambdaInvocation-DynamoDB as the policy to apply for our purpose:

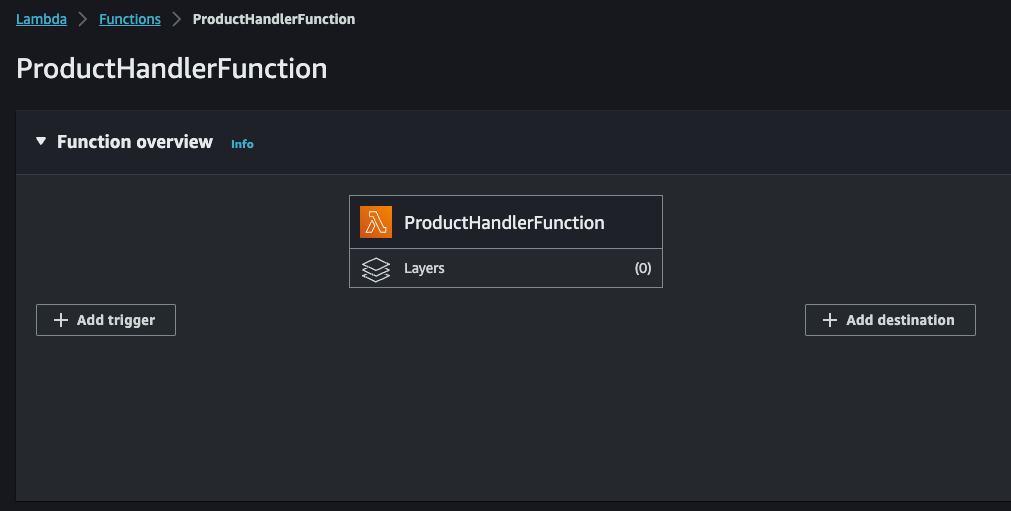
Upon completion we will find our Lambda function in the relevant section on AWS Console:
We can now click on Add trigger to add DynamoDB stream as the source of our Lambda function:
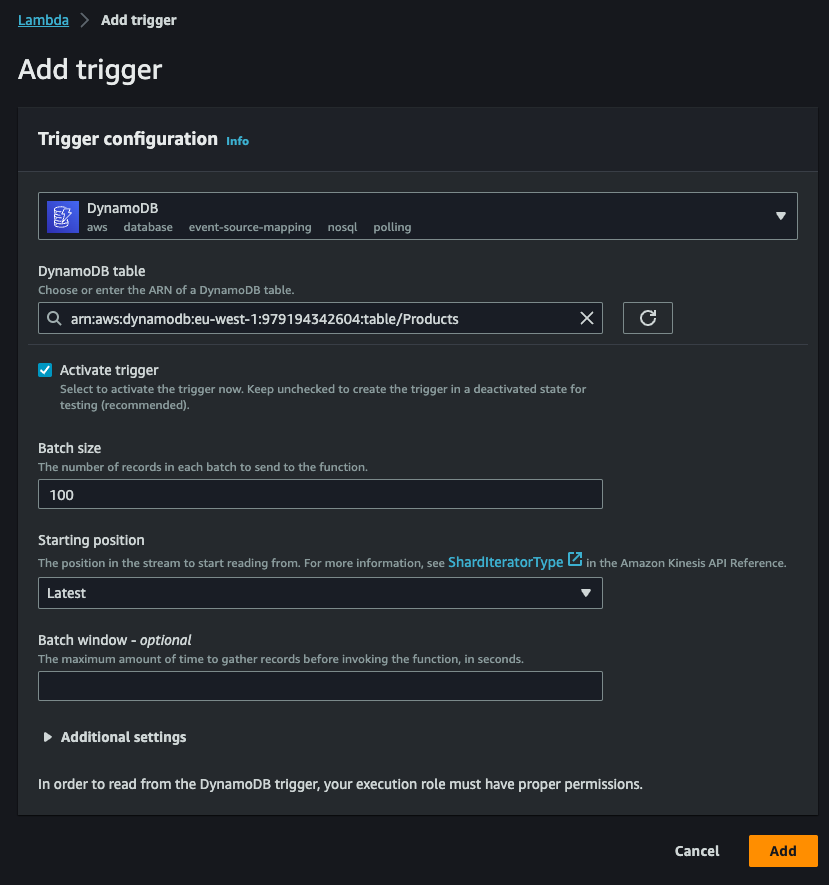
The trigger, as shown above, will allow us to intercept any write event on the Products table in DynamoDB. Finally, the Lambda function will take care of transforming the received information in the most appropriate way and save it to the Amazon Aurora database, ready to be used later by the read model.
Maximizing performance with Amazon Aurora replication
The choice of Amazon Aurora as the repository for read operations is not accidental. As anticipated, Amazon Aurora allows the configuration of read replicas, mirror copies of the primary database whose purpose is to improve system performance by allowing multiple users to access data simultaneously.
When a read operation is performed on a replica, the load is distributed between the primary database and the read replicas, thus reducing the load on the primary database and allowing more read requests to be handled.
The Amazon Aurora read replicas are synchronized continuously with the primary database to ensure that the data is always up to date. This ensures that, in the event of a loss, one of the read replicas can be promoted to the primary database to ensure continuity of service.
Configuring Amazon Aurora and the read replicas
The replication capability of Amazon Aurora can thus be an additional weapon to enable highly scalable and performant services.
Configuration of Amazon Aurora and read replicas can be done by directly accessing the Amazon RDS service and selecting the previously created Aurora database:

If not already done, add a reader node by clicking on Actions and then on Add reader:
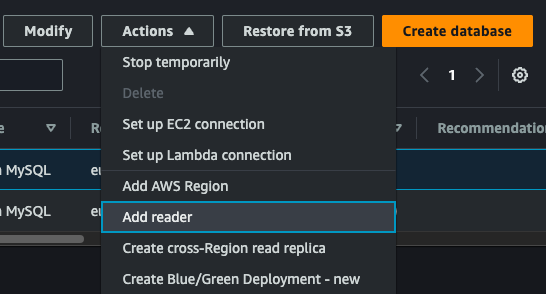
We assign it a name, check all the creation parameters, and confirm the creation. With this action we can create several read replicas and increase the scalability of our solution. In addition, we can also take advantage of the auto scaling capability by configuring, again from the Actions menu, auto scaling for read nodes based on CPU utilization or number of connections, also setting the minimum and maximum nodes to be used.
Conclusion
In this first article, we have seen how we can manage two different storage to support an architecture based on the CQRS model, with the ability to replicate and adapt the data appropriately based on the different needs of the read and write models.
AWS offers important solutions that can be leveraged to achieve the desired performance and scalability. Of course, it is always a good idea to keep a close eye on the costs arising from each and every choice we place in our architectural solutions.
In the next articles we will see how to improve the solution for which we have just laid the foundation.
As always, any feedback is welcome!
Enjoy!