


Deploy .NET 6 Minimal API to AWS Lambda via GitHub
21 Mar 2022
Serverless currently is for sure one of the most popular words of the last few years, at least in the Cloud Computing world. But, what does it mean? This is one of the most simple definitions I found:
Serverless is a cloud-native development model that allows developers to build and run applications without having to manage servers (RedHat).
So, this means that servers are still there (fiuuu…).
Serverless doesn’t mean “without server”, but it is more related to ownership of resources, load balancing, scalability, and the other server things that a developer doesn’t need to manage. Servers technologies are abstracted away from development.
AWS currently has a lot of services useful to implement serverless applications. One of the most well knows is AWS Lambda. An AWS Lambda is composed of two-part: a function, the code and runtime that process events, and a trigger, the AWS service or application that causes the function execution. In this post we are going to see out to deploy an AWS Lambda function developed with the new .NET 6 Minimal API, using GitHub as a source repository.
Toolbox
Before we get into the steps, a few words about the AWS services and tools we are going to use:
- AWS Lambda: a serverless, event-driven compute service that lets you run code for virtually any type of application or backend service without provisioning or managing servers. One of the most important points is that you only pay for what you use, which in that case means that you only pay for the execution time. More info at the official page.
- AWS CodePipeline: a fully managed continuous delivery service. With CodePipeline you can automate the build and deploy service. Check the official page.
- AWS Lambda Tools for .NET Core: a set of commands to create and deploy .NET-based Lambda applications. See here for more info.
- GitHub: the git repository that we are going to use for our source code. You can use what you prefer, like Bitbucket.
- Visual Studio Code: the cross-platform editor to write our .NET AWS Lambda application.
So, now let’s start and see what happens.
Create the .NET Lambda serverless project
The .NET Core CLI is the easiest way to create a .NET Lambda project. As always, you need to use the predefined AWS Lambda .NET Project templates with the dotnet new command. First, if you need to install the templates, open your command line tool, or terminal on macOS, and use the dotnet new -i command to install the Lambda Project Templates:
dotnet new -i Amazon.Lambda.Templates
after the installation was completed, you can proceed with creating the project. So, in your command line program, go to the base directory of your repository and use the serverless.AspNetCoreMinimalAPI as shown here:
dotnet new serverless.AspNetCoreMinimalAPI -n myAwesomeLambda
the project is now ready. Under the folder src/myAwesomeLambda, in the Program.cs, you’ll find all the useful code to run your Minimal API. You can change the code and implement the APIs based on your needs.
Setup your project for AWS CodePipeline
For this post, it is useful to look at these two specific files created by the serverless template:
aws-lambda-tools-defaults.jsonserverless.template
the aws-lambda-tools-defaults.json contains all the deployment info that you can use in the command line to deploy the lambda function. We’ll see the command line instruction later. The serverless.template, instead, is the JSON template that allows the creation of the serverless service by using AWS CloudFormation. you can find more info here. In this article we are going to use only the AWS Lambda Tools for .NET Core.
As seen in the previous post, we need to use the buildspec.yml file to build our solution by using AWS CodePipeline. Before we can proceed with the build and deploy command, we need to be sure that all the CLI are correctly installed on the build machine. To do that, we first need to install the latest dotnet version and then install, or update, the Amazon.Lambda.Tools by using the dotnet tool update command, as you can see in the following file buildspec.yml file:
version: 0.2

phases:
    install:
        commands:
            - /usr/local/bin/dotnet-install.sh --channel LTS
            - dotnet tool update -g Amazon.Lambda.Tools

    build:
        commands:
            - dotnet lambda deploy-function myAwesomeLambda --project-location ./src/myAwesomeLambda/ --function-role myAwesomeLambdaRole --config-file aws-lambda-tools-defaults.json
The dotnet lambda deploy-function is the command you can call to build, package, and deploy your AWS Lambda function written in .NET. As written above, all the options specified here can be set also in the aws-lambda-tools-defaults-json file.
Here is an example:
{
  "profile": "default",
  "region": "eu-west-1",
  "configuration": "Release",
  "function-runtime": "dotnet6",
  "function-memory-size": 256,
  "function-timeout": 30,
  "function-handler": "myAwesomeLambda",
  "s3-prefix": "myAwesomeLambda/"
}
Now we can push our first repository version and then start configuring our AWS CodePipeline.
Configuring and building the AWS CodePipeline
In a very similar way to what we have done in the previous post, we are going to create our AWS CodePipeline to build and publish the .NET AWS Lambda function. The AWS CodePipeline will pull the source code from GitHub and then pass the artifact to the build server.
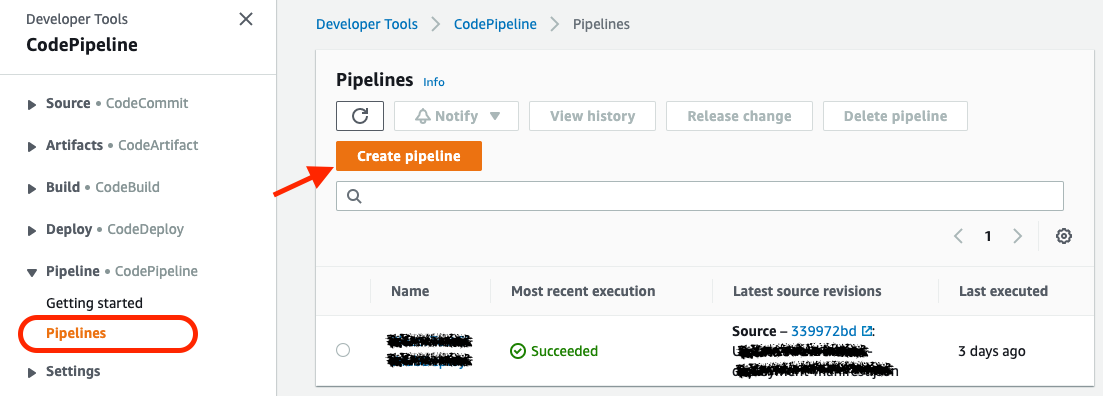
So, first of all, we need to go to CodePipeline section on our AWS Console, and click the Create Pipeline button:
Define the Pipeline name and click on Next:
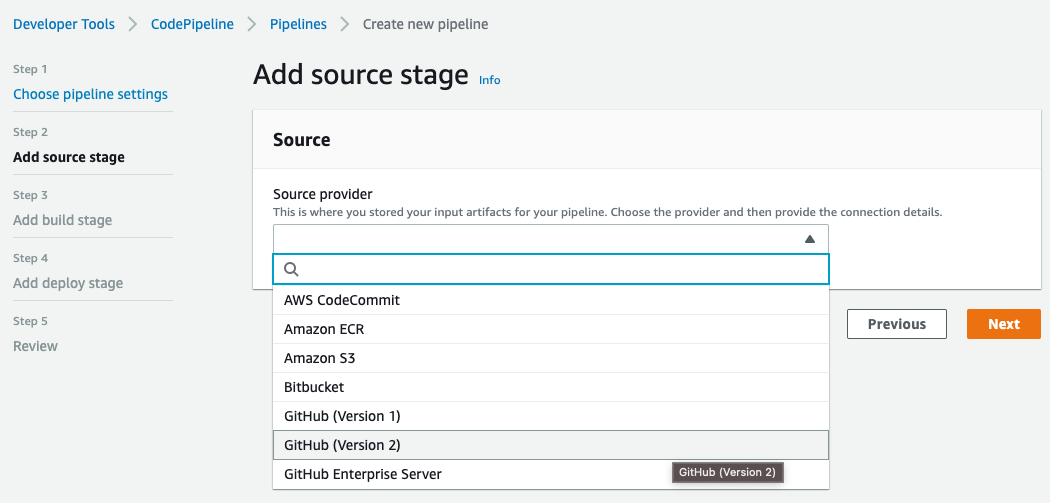
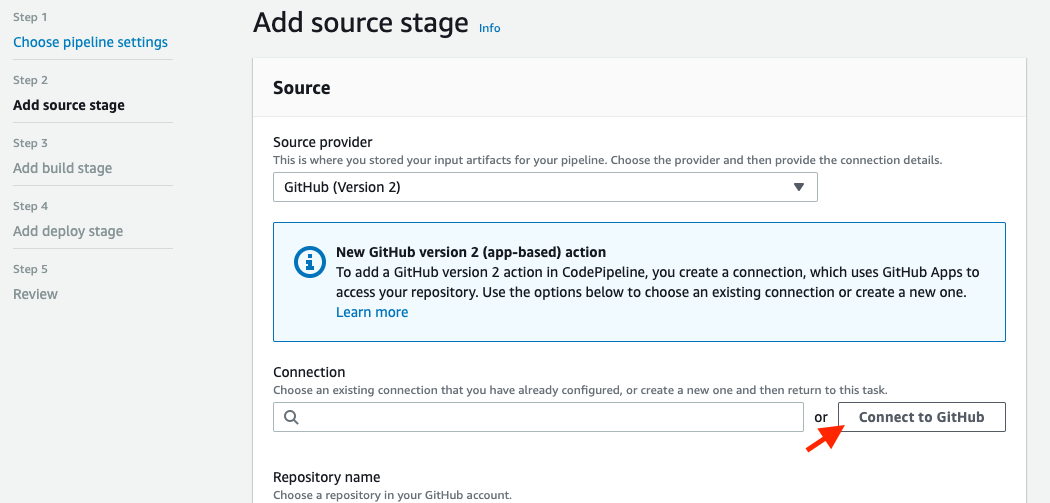
Select GitHub (Version 2) as Source provider. Then create a new GitHub connection by clicking on Connect to GitHub button:
Configure the GitHub connection
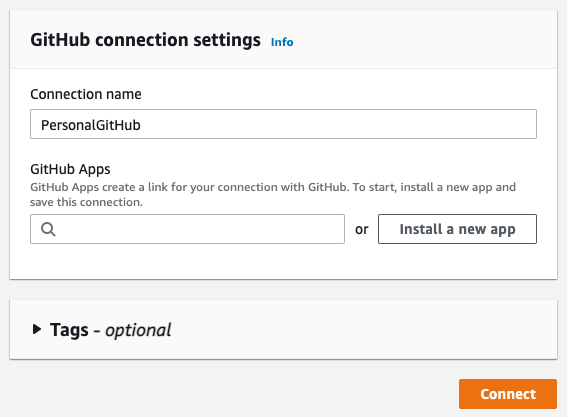
To use GitHub as a source, we first need to connect to our account. So on this page, set a name for the new connection and click Connect to GitHub:

Click Install a new app to install AWS Connector for GitHub on your GitHub account and follow the instructions on the page. Then click Connect to complete this step:
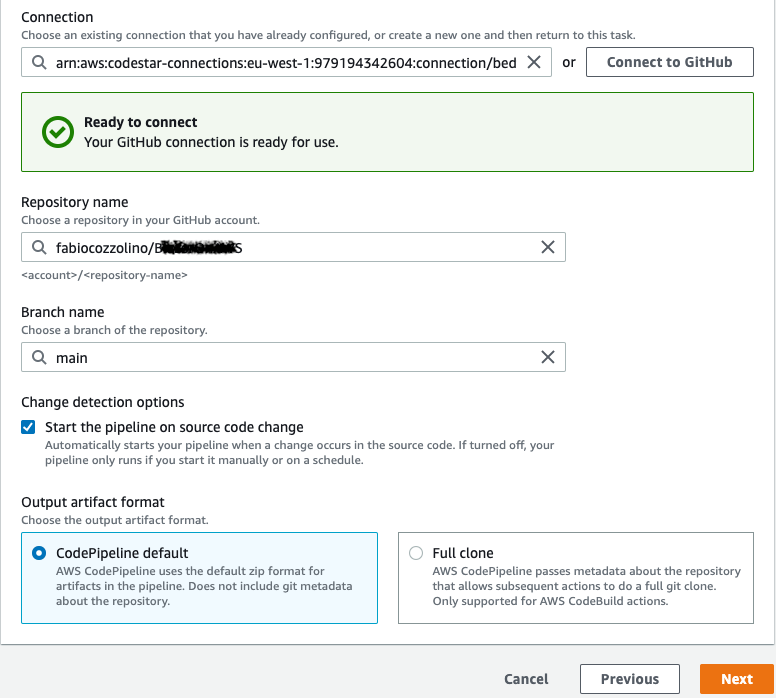
Now you can complete the GitHub source configuration by selecting the Repository and the Branch name and clicking to Next:
Setting up the build stage
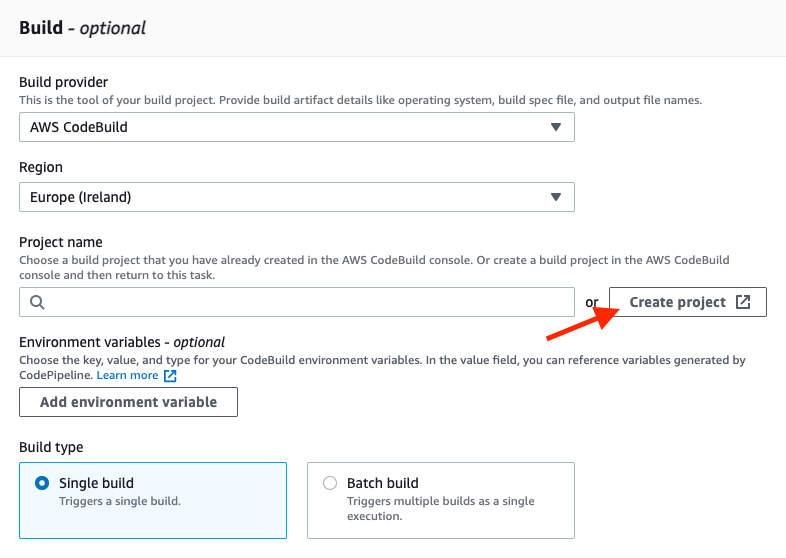
After defining the source code repository, we need to create the build stage. In our project, we select AWS CodeBuild as the engine for the build. Specify your preferred region and create a new build project by clicking Create project:
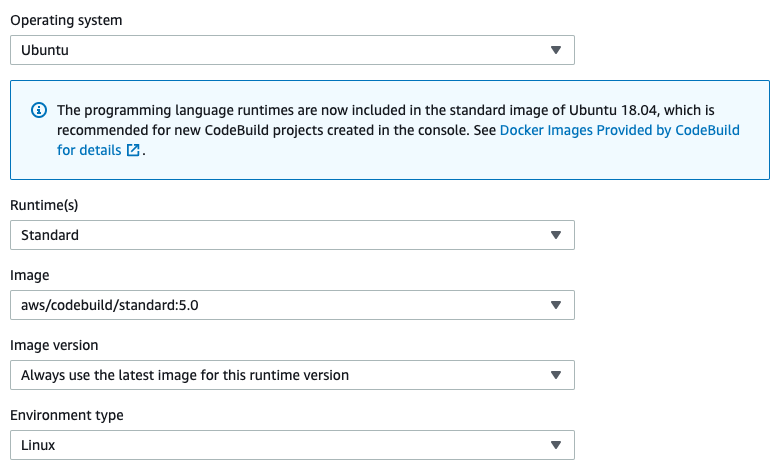
Here, after setting the Project name, go to the Environment section and choose Ubuntu as the operating system, as you can see in the image below:
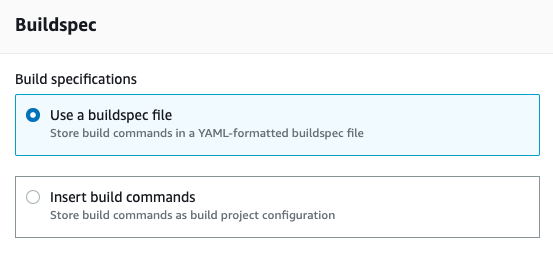
Make sure that the Use a buildspec file option is already selected in the Buildspec section. As above specified, we are going to use the buildspec.yml:
Define the Deploy stage
Since the deployment is made by the build server, we don’t need to set the Deploy stage, so we can skip this step.
Run the pipeline
We are ready. Now we can push our code to the remote repository and start the pipeline. At this time, you could encounter this error message:
Error creating Lambda function: User: arn:aws:sts::assumed-role/build-role/AWSCodeBuild-xxx is not authorized to perform: iam:PassRole on resource: arn:aws:iam::xxx:role/myAwesomeLambdaRole because no identity-based policy allows the iam:PassRole action
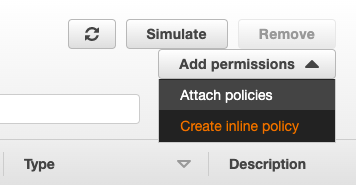
To solve the issue, we need to assign the iam:PassRole permission to the running role of codebuild. So, go to IAM > Roles, select the role created for the AWS CodeBuild service, then create a specific policy by clicking on Add permission > Create inline policy:
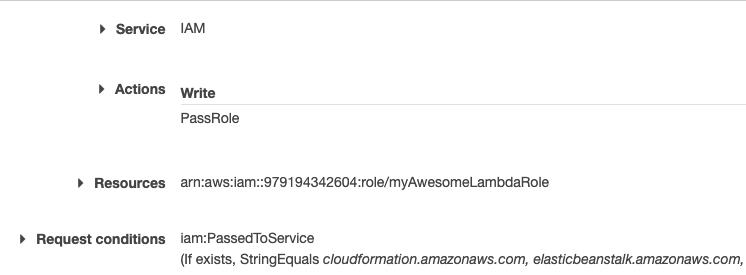
and then select the rules as in the following image (be sure to have the target Lambda service role ARN):
After a few minutes, you can go to the AWS Lambda console section and test your running code.
Test your Lambda function
Now all the things are ready. Based on our configuration, the pipeline runs after each change in the GitHub source repository. In the end, you can go to the Lambda section, select your Lambda function instance and check if it is running fine. In AWS console, you can also test your Lambda function. Simply click on Test tab and select your preferred template from the list:
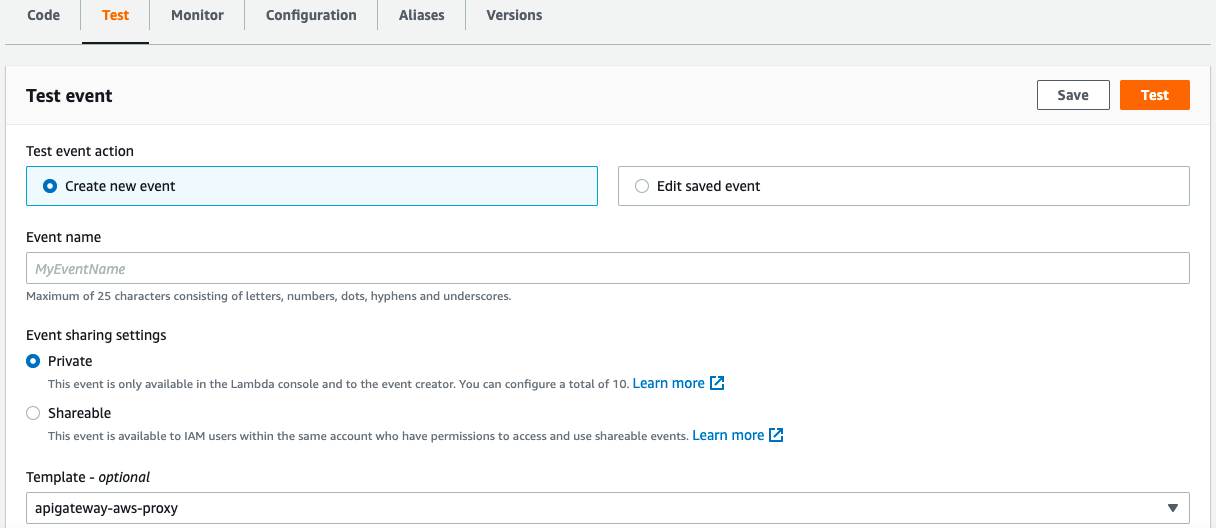
The simpler way to test the Lambda function is by using the API Gateway AWS Proxy template. Our Lambda function is built to reply to HTTP requests. An HTTP request can be made internally in your private network or could come from an external client, through an API Gateway. We’ll see this alternative way in the next post. For the sake of this post, to test the call, we can use the following JSON document and set all the attributes useful to execute the request by invoking the HTTP GET method:
{
  "body": "",
  "resource": "/{proxy+}",
  "path": "/",
  "httpMethod": "GET"
}
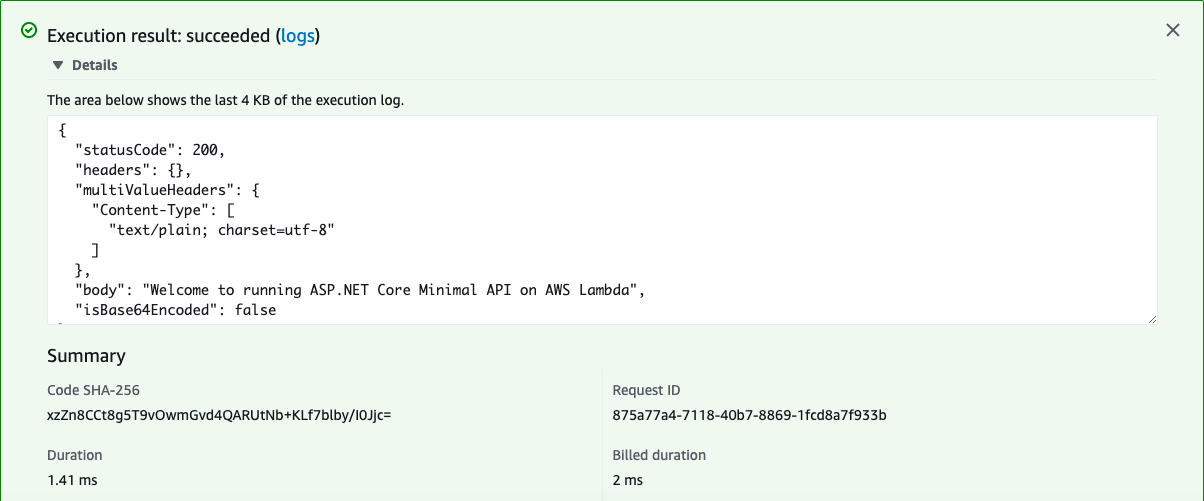
Now you can push the Test button on upper right corner and see the result:
As always, any feedback is welcome!
Enjoy!