07 Mar 2022
In the latest post we explore a possibile way to deploy a Blazor WebAssembly. Now, I would like to check how much will cost the solution and look at the AWS services.
The solution, requires usage of different services:
- CodeBuild
- Elastic Beanstalk
- Elastic Load Balancer
- EC2 Instance
- EC2 Others (Volume Usage, in my case)
As said in my previous post, AWS Elastic Beanstalk give you the ability to have an application running without the necessity to think about the service needed, like the Load Balancer. This is why you read Elastic Load Balancer in the cost list.
By using AWS Cost Explorer, part of the AWS Cost Management, we can create reports and analyze the costs of our AWS solution.
CodeBuild costs
The CodeBuild cost for a Linux build machine is calculated in 0,01 euro cents per minute of execution. So if your run 3 release pipeline in a day, and each pipeline requires 4 minutes to complete, you’ll have a cost of 0,12 cents per day. An average of 2,14 in a month (considering 20 working days). Not bad.
Elastic Beanstalk
My Elastic Beanstalk solution, very simple, is composed by one instance of Elastic Cloud Computing, with auto-scaling enabled, and one Elastic Load Balancing. To calculate the costs, we must keep in mind two main values: execution time and volume usage. Respectively we will have an EC2 running cost and a EBS (Elastic Block Store) consumption costs.
So, each Elastic Beanstalk instance will costs:
- [EC2] € 0,061 per On Demand Windows t3.medium Instance Hour: € 1,46/day
- [EBS] € 0,10 per GB-month of General Purpose SSD (gp2) provisioned storage - EU (Ireland): in my case 2,629 GB/Month
Each Elastic Load Balancing
- $0.008 per used Application load balancer capacity unit-hour (or partial hour): € 0,192/day
- $0.0252 per Application LoadBalancer-hour (or partial hour): € 0,60/day
Ok, so how much I’ll pay per month?
We see the cost in details. Assuming we are in a month of 30 days, here the sum of your cost:
| Service |
Hypotetic cost per day |
Hypotetic cost per month |
| CodePipeline |
€ 0,12 |
€ 2,14 |
| EC2 |
€ 1,46 |
€ 43,80 |
| EBS |
|
€ 0,26 |
| ALB capacity |
€ 0,192 |
€ 5,76 |
| ALB hour |
€ 0,60 |
€ 18,00 |
| |
|
|
| Total |
|
€ 69,96 |
So, final cost will about € 70 per month. This is a small forecast of the app running with very small traffic. The app is not well optimized. In the next posts we will see how we can mantain an acceptable cost, or reducing it, by introducing new services.
As always, any feedback is welcome!
28 Feb 2022
This post is the first in a new series looking at .NET on AWS. Why AWS? The answer is … why not! Perhaps not everyone knows that .NET is a first class citizen on AWS. Right after the Java SDK, .NET SDK was one of the first SDKs released in early 2010.
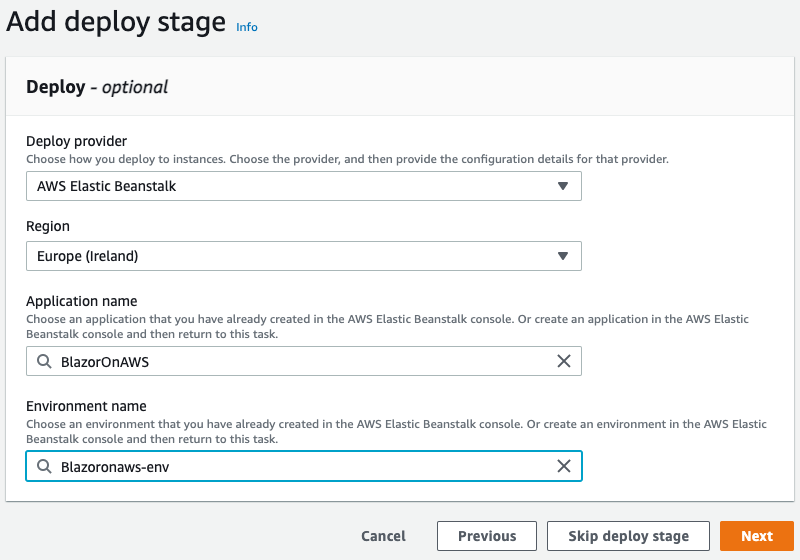
In this post, we will explore one of the alternative ways to deploy a Blazor WebAssembly application on AWS Elastic Beanstalk. We will use GitHub as the repository and AWS CodePipeline to retrieve the source code, build the project, generate the required artifacts, and then deploy it to the AWS Elastic Beanstalk instance. And the target framework for the project is .NET 6.
Before we get into the steps, a few words about the AWS services we will be using:
- AWS Elastic Beanstalk: an easy-to-use service for deploying and scaling web applications and services. This means that we can simply work on our code and the engine automatically handles the environment stuff needed to successfully execute the application, like deployment, capacity, load balancing, auto-scaling, and things like that. If you prefer, you can also modify all the environment settings to better fit your needs. More info at the official page.
- AWS CodePipeline: a fully managed continuos delivery service. With CodePipeline you can automate the build and deploy service. More info at the official page.
Create the AWS Elastic Beanstalk instance
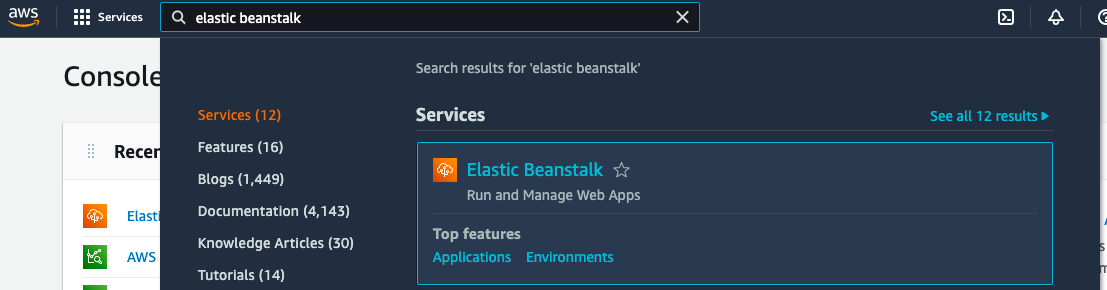
First, we create the Beanstalk project that will host the application. In the AWS console, we can search for Beanstalk and select the appropriate scope:
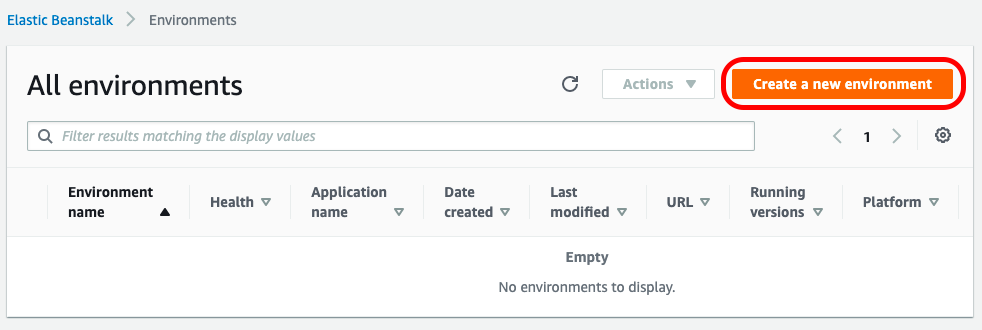
To run our Blazor application on AWS, we need to create a new Windows environment in the Elastic Beanstalk section. To do this, click on Create a new environment:
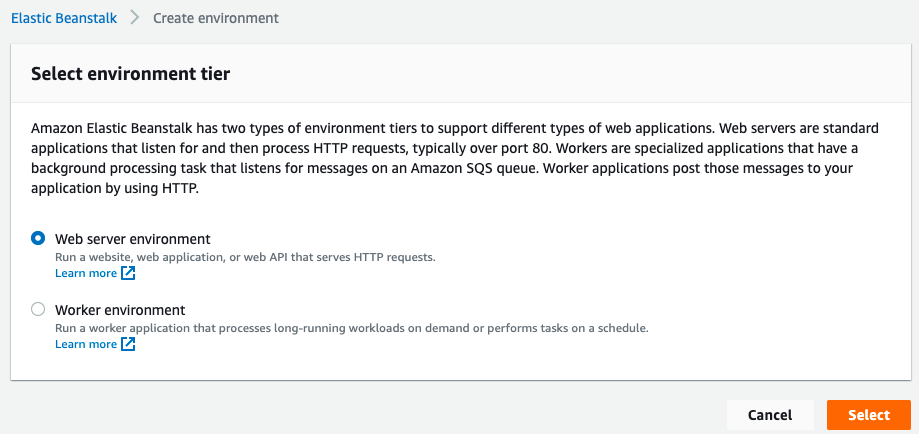
then select Web server environment:
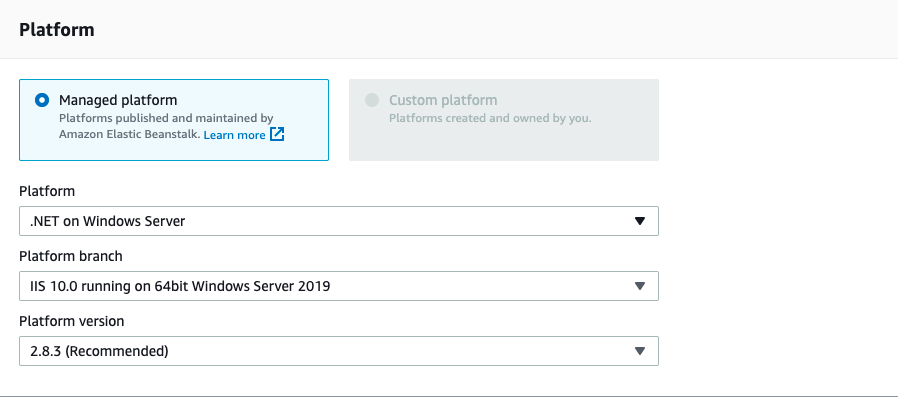
and finally, after setting the name, we need to set the .NET on Windows Server platform:
Be sure to leave Sample Application selected on Application Code, this is a good starting point to have a preconfigured environment, and then click the Create environment button at the bottom of the page. After a few minutes the environment is ready and we can start the next step: building the pipeline.
Build with AWS CodePipeline
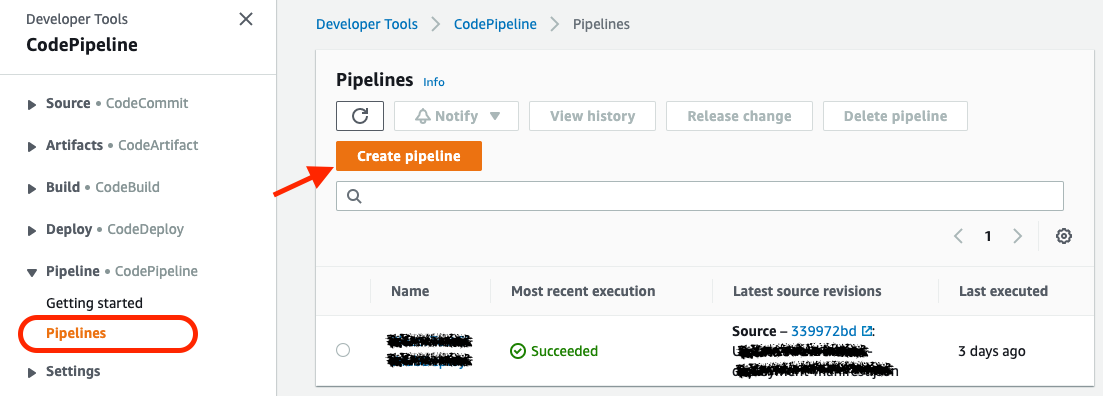
With CodePipeline, you can create your build pipeline on AWS, pull source code from GitHub, and deploy all artifacts to Elastic Beanstalk. Now go to CodePipeline and click the Create Pipeline button:
Define the Pipeline name and click on Next:
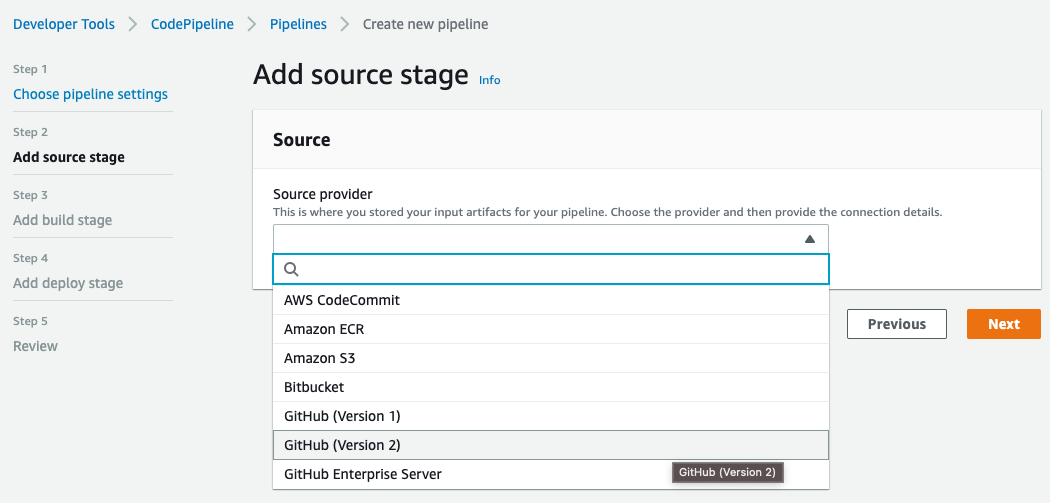
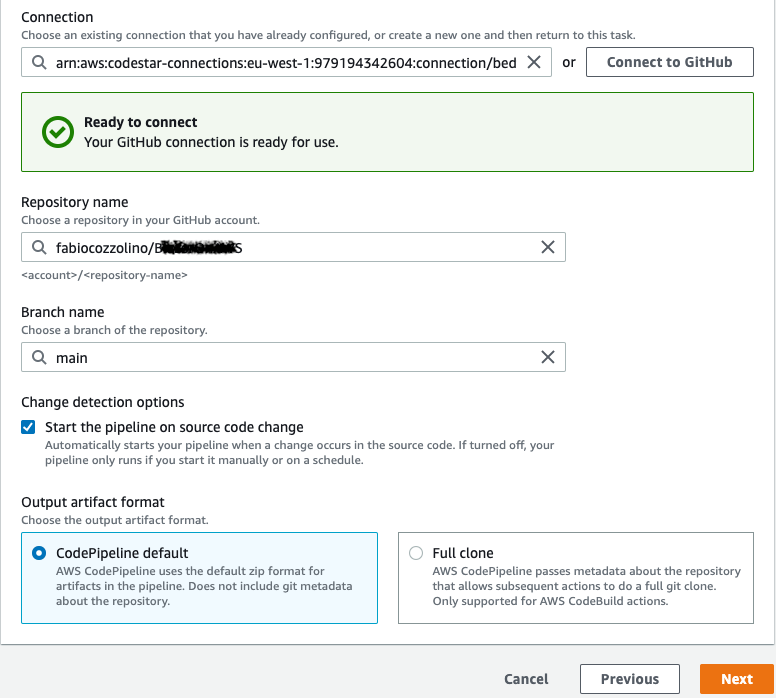
Select GitHub (Version 2) as Source provider. Then create a new GitHub connection by clicking on Connect to GitHub button:
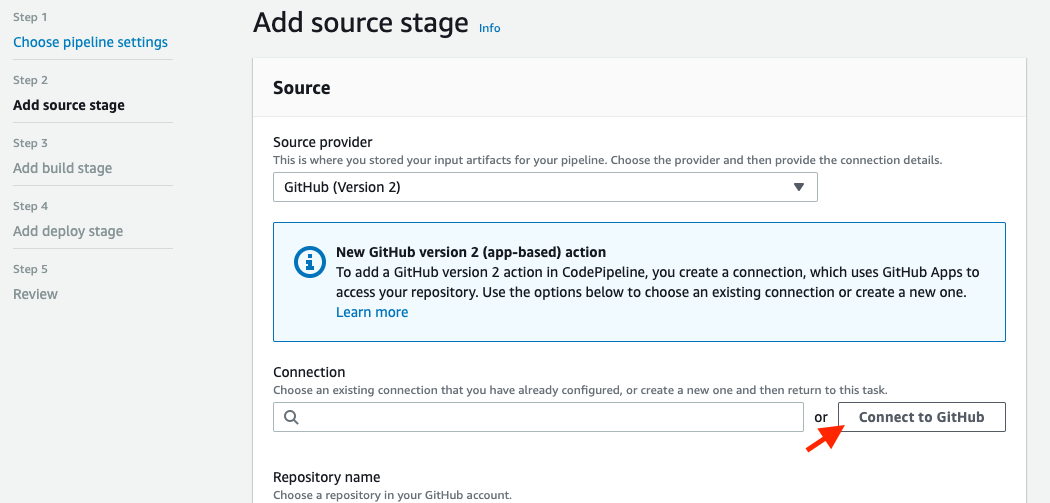
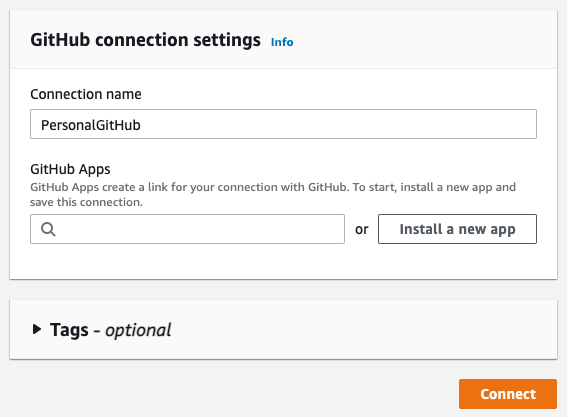
To use GitHub as a source, we first need to connect to our account. So on this page, set a name for the new connection and click Connect to GitHub:

Click Install a new app to install AWS Connector for GitHub on your GitHub account and follow the instructions on the page. Then click Connect to complete this step:
Now you can complete the GitHub source configuration by selecting the Repository and the Branch name and clicking to Next:
Setting up the build stage
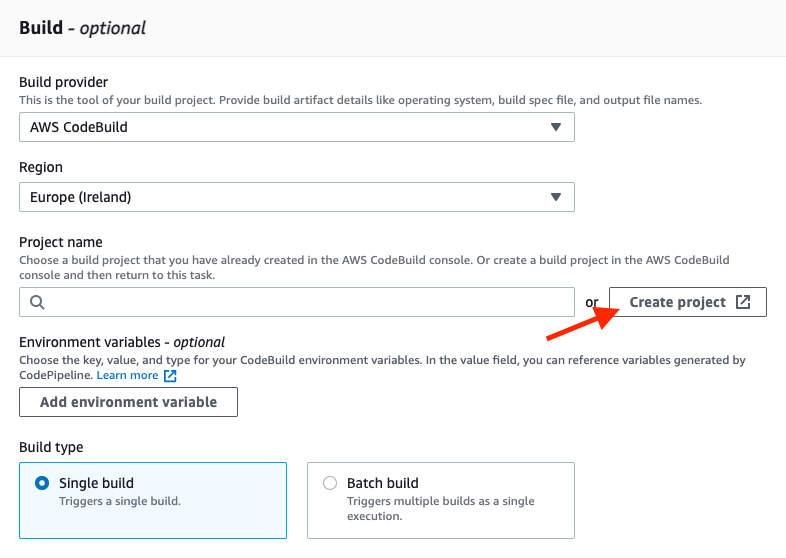
After defining the source code repository, we need to create the build stage. In our project, we select AWS CodeBuild as the engine for the build. Specify your preferred region and create a new build project by clicking Create project:
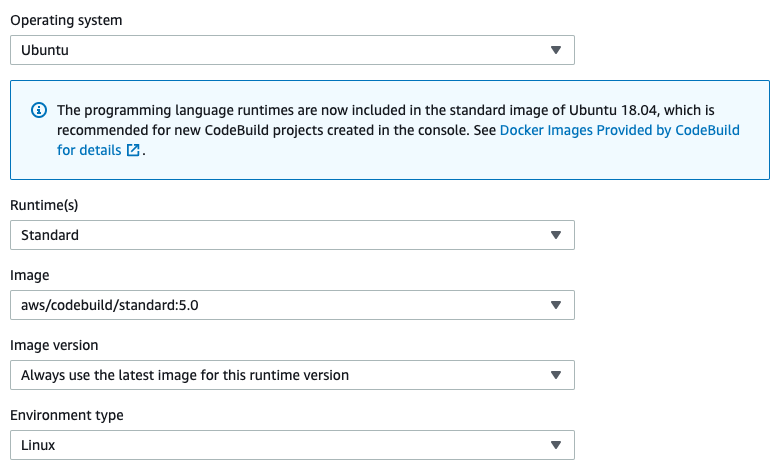
Here, after setting the Project name, go to the Environment section and choose Ubuntu as the operating system, as you can see in the image below:
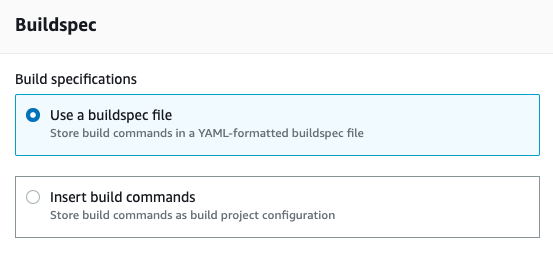
Make sure that the Use a buildspec file option is already selected in the Buildspec section. This file is needed for configuring the build phase in the Blazor project. We’ll talk about the buildspec.yml file later:
Define the Deploy stage
At the end of the pipeline, all artifacts in our environment must be deployed. So, configure the deployment phase for AWS Elastic Beanstalk, as you can see in the figure below:
The final step is project configuration. AWS CodeBuild, which is used by AWS CodePipeline, requires a set of specific instructions to build your project. All of these instructions must be written in the buildspec.yml, a build specification file. This file must be located in the root directory of your source code. For more information about this file, see the following page.
To build a Blazor project, I found the following ‘buildspec.yml’ very useful and simple:
version: 0.2

phases:
    install:
        commands:
            - /usr/local/bin/dotnet-install.sh --channel LTS

    build:
        commands:
            - dotnet build -c Release ./BlazorOnAWS.csproj
            - dotnet publish -o dist

artifacts:
    files:
        - dist/**/*
        - aws-windows-deployment-manifest.json
The above file consists of two main parts: the phase definition and the artifact output. In the phase definition, we first need to be sure that the latest .NET versions is already installed. Unfortunately, the images used in AWS CodeBuild don’t currently support .NET 6. Therefore, we need to use the dotnet-install.sh command to install it just before the build commands. For more information about the script, see this page.
After the installation phase is complete, the build phase runs the dotnet build and the dotnet publish commands and copies the output to the dist, the custom output folder.
The final step is to create a package with the output from the dist/**/* directory and the aws-windows-deployment-manifest.json file, which the Elastic Beanstalk Windows container reads to determine how to deploy the application. Here’s the content of the file I used in my example:
{
    "manifestVersion": 1,
    "deployments": {
        "aspNetCoreWeb": [
        {
            "name": "test-dotnet-core",
            "parameters": {
                "appBundle": "dist",
                "iisPath": "/",
                "iisWebSite": "Default Web Site"
            }
        }
        ]
    }
}
The manifest file, stored in the generated artifact as a zip file, indicate the dist folder as appBundle, giving instruction on AWS Elastic Beanstalk on how to deploy the application. More info about the file specification are available here.
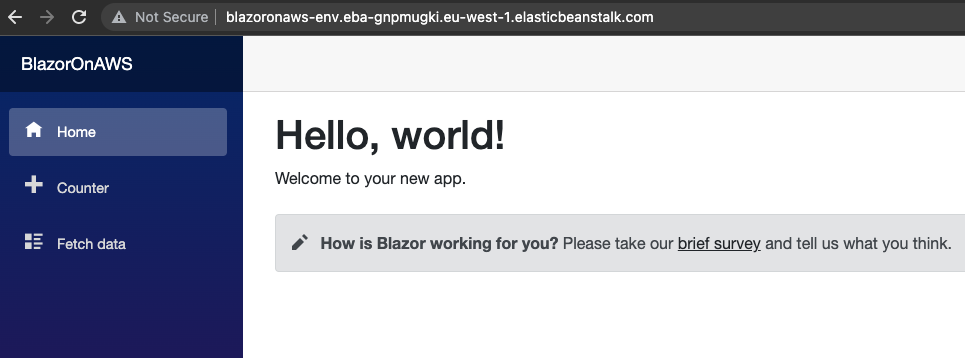
Run the app
Now all the things are ready. Based on our configuration, the pipeline runs after each change in the GitHub source repository. At the end, you can go to the Elastic Beanstalk instance, click on the instance urls, and enjoy your Blazor WASM app:
As always, any feedback is welcome!
Enjoy!
21 Dec 2021
It’s been a really long time from my last post. Many things are changed in my personal life: my son was born on march (WOW!).
As you know, it is a life-changing event. No sleep for months and less free time for passions (sports, writing, etc.). Priorities are changed. It’s always a problem of priorities. When you said “I have no time for…”, you’re actually saying that activity has a lower priority. You have other priorities.
So, now, let’s restart my blog and community activities. 2022 is going to be a great year for developers.
Enjoy!
20 Jun 2020
Today I would like to talk about Rebus, a simple and lean message bus implementation for .NET. Originally developed by Mogens Heller Grabe and supported by the community, Rebus is robust and works well with a minimum level of configuration, but its main strength is extensibility. With this in mind, Rebus offers many ways to customize things like:
- transport
- subscriptions
- logging
- serialization
- encryption
- and more…
If you want to reead the basics of Rebus, please check the official documentation wiki.
The main thing in Rebus is the concept of Transport. Basically, the transport is the mechanism used to transfer your messages. You can choose from a great list of transport already developed, like InMemory, RabbitMQ or Azure Service Bus, or you can develop your own transport. It depends from you architectural model.
Another main point, necessary in some context like Publish and Subscribe implementation, is the Subscription Storage. Every time that a subscription is added to a specific topic, Rebus needs to keep track of it and finally use that storage to get the list of subscribers and dispatch them the published messages.
In this post, we’ll see how to implement a simple Subscription Storage to store subscriptions on FileSystem.
Extending Rebus: Implements ISubscriptionStorage interface
The first thing we need to do is implement the ISubscriptionStorage interface:
public interface ISubscriptionStorage
{
    /// <summary>
    /// Gets all destination addresses for the given topic
    /// </summary>
    Task<string[]> GetSubscriberAddresses(string topic);

    /// <summary>
    /// Registers the given <paramref name="subscriberAddress"/> as a subscriber of the given topic
    /// </summary>
    Task RegisterSubscriber(string topic, string subscriberAddress);

    /// <summary>
    /// Unregisters the given <paramref name="subscriberAddress"/> as a subscriber of the given topic
    /// </summary>
    Task UnregisterSubscriber(string topic, string subscriberAddress);

    /// <summary>
    /// Gets whether the subscription storage is centralized and thus supports bypassing the usual subscription request
    /// (in a fully distributed architecture, a subscription is established by sending a <see cref="SubscribeRequest"/>
    /// to the owner of a given topic, who then remembers the subscriber somehow - if the subscription storage is
    /// centralized, the message exchange can be bypassed, and the subscription can be established directly by
    /// having the subscriber register itself)
    /// </summary>
    bool IsCentralized { get; }
}
So, now we proceed by creating the FileSystemSubscriptionStorage that implements the ISubscriptionStorage:
internal class FileSystemSubscriptionStorage : ISubscriptionStorage
{
    private readonly string folderPath;

    public FileSystemSubscriptionStorage(string folderPath)
    {
        this.folderPath = folderPath;
    }
    ...
}
We need to know the root folder where subscribers will be stored, so the constructor accept the full path as parameter. Now, the first method will go to implement is RegisterSubscriber:
public Task RegisterSubscriber(string topic, string subscriberAddress)
{
    return Task.Run(() =>
    {
        var topicPath = Path.Combine(folderPath, Hash(topic));
        if (!Directory.Exists(topicPath))
        {
            Directory.CreateDirectory(topicPath);
        }

        var subscriberAddressFile = Path.Combine(topicPath, Hash(subscriberAddress) + ".subscriber");
        if (!File.Exists(subscriberAddressFile))
        {
            File.WriteAllText(subscriberAddressFile, subscriberAddress);
        }
    });
}
The RegisterSubscriber method accept two parameters: topic and subscriberAddress. In our implementation, we are going to create a folder for each topic and then a file for each subscriber. Both will be created by using a simple hash, so we can easily get a correct path name avoiding wrong chars.
The file will be a simple text file with the clear subscriberAddress.
The GetSubscriberAddresses method, instead, retrieve the list of subscribers based on input topic. So, we could simply read all files in a folder to get the full list:
public Task<string[]> GetSubscriberAddresses(string topic)
{
    return Task.Run(() =>
    {
        var topicPath = Path.Combine(folderPath, Hash(topic));
        if (!Directory.Exists(topicPath))
        {
            return new string[0];
        }
        return Directory.GetFiles(topicPath, "*.subscriber").Select(f => File.ReadAllText(f)).ToArray();
    });
}
last, but not least, the UnregisterSubscriber will delete the required subscriberAddress from the input topic:
public Task UnregisterSubscriber(string topic, string subscriberAddress)
{
    return Task.Run(() =>
    {
        var topicPath = Path.Combine(folderPath, Hash(topic));
        if (!Directory.Exists(topicPath))
        {
            Directory.CreateDirectory(topicPath);
        }

        var subscriberAddressFile = Path.Combine(topicPath, Hash(subscriberAddress) + ".subscriber");
        if (File.Exists(subscriberAddressFile))
        {
            File.Delete(subscriberAddressFile);
        }
    });
}
Using the FileSystemSubscriptionStorage
Following the Configuration API patterns, we’ll develop an extensions method to configure the FileSystemSubscriptionStorage:
public static class FileSystemSubscriptionStorageConfigurationExtensions
{
    public static void UseFileSystem(this StandardConfigurer<ISubscriptionStorage> configurer, string folderPath)
    {
        configurer.Register(context =>
        {
            return new FileSystemSubscriptionStorage(folderPath);
        });
    }
}
Then, in the configuration section, we’ll use it in this way:
adapter = new BuiltinHandlerActivator();

Configure.With(adapter)
    .Subscriptions(s => s.UseFileSystem(subscriptionsPath))
    .Start();
Conclusion
In this post we have explored one way to extend Rebus. Today, a framework with extensibility built in mind is a great starting point. You can use it as is, or you can join the wonderful community and extend it.
Enjoy!
09 Mar 2020
Evolving is a necessary step to survive and the software architecture is not an exception. Also designing a gRPC service means that something may change in the future. So, what happen if we change the ProtoBuf definition?
Evolving a contract definition means that we can add a new field, for example, or remove an existing one. Or we could introduce a new service and deprecate an existing one. And obviusly we’d like that the client still continue to work.
Let’s see what happens.
Break the ProtoBuf definition
We can start with the previously seen .proto file:
// The bookshelf service definition
service BookService {
  // Get full list of books
  rpc SaveBook (BookRequest) returns (BookReply);
}

// The Book message represents a book instance
message BookRequest {
  string title = 1;
  string description = 2;
}

// The Book message represents a book instance
message BookReply {
  int32 bookId = 1;
  string title = 2;
  string description = 3;
}
what will happens if we change the message? Let me explore the different ways we can break the contract!
Adding new fields
In the brand new version of our service we need to carry on author information in the BookRequest message. To do that, we add a new message called Author and a new author field:
message BookRequest {
  string title = 1;
  string description = 2;
  Author author = 3;
}

message Author {
  string firstName = 1;
  string lastName = 2;
}
Adding new fields will not break the contract, so all the previusly generated clients will still work fine! The new fields will simply have their default value. Note that fields are optional by default, but you can declare them mandatory by using the keyword required.
The most important thing is not the field name, but only the field number. Preserve it, don’t change the field types, and your contract will not be broken.
NOTE: The message fields name or their order are not important. Each field in the message definition has a unique field number, used to identify your field in the message binary format. Don’t change it in live environment, it ill break the contract!
Remove a field
We can remove a field from a message? Obviusly we can do it, but all the old clients still continue to send unnecessary data. Note that if a client send an unexpected field, the server will ignore it without throwing exception.
You need to establish a plan to softly replace the property with the new one:
- Introduce the new field int the message contract and leave the old field
- In the next release, introduce a warning when old client still doesn’t send new field
- Finaly, two release after new field introduction, remove the old field and accept value only from the new field
Obviously you could adapt the plan as you wish!
Note that if you want to use a new field name without change its type or order, do it, no one will notice.
Conclusion
Things can change and your gRPC service must evolve. Don’t worry, do it carefully.
Enjoy!
check full code on github
01 Mar 2020
If your answer is Google, you are not wrong. But actually, the gRPC team change the meaning of ‘g’ every release. In short words, ‘g’ stands for:
- 1.0 ‘g’ stands for ‘gRPC’
- 1.1 ‘g’ stands for ‘good’
- 1.2 ‘g’ stands for ‘green’
- 1.3 ‘g’ stands for ‘gentle’
- 1.4 ‘g’ stands for ‘gregarious’
- 1.6 ‘g’ stands for ‘garcia’
- 1.7 ‘g’ stands for ‘gambit’
- 1.8 ‘g’ stands for ‘generous’
- 1.9 ‘g’ stands for ‘glossy’
- 1.10 ‘g’ stands for ‘glamorous’
- 1.11 ‘g’ stands for ‘gorgeous’
- 1.12 ‘g’ stands for ‘glorious’
- 1.13 ‘g’ stands for ‘gloriosa’
- 1.14 ‘g’ stands for ‘gladiolus’
- 1.15 ‘g’ stands for ‘glider’
- 1.16 ‘g’ stands for ‘gao’
- 1.17 ‘g’ stands for ‘gizmo’
- 1.18 ‘g’ stands for ‘goose’
- 1.19 ‘g’ stands for ‘gold’
- 1.20 ‘g’ stands for ‘godric’
- 1.21 ‘g’ stands for ‘gandalf’
- 1.22 ‘g’ stands for ‘gale’
- 1.23 ‘g’ stands for ‘gangnam’
- 1.24 ‘g’ stands for ‘ganges’
- 1.25 ‘g’ stands for ‘game’
- 1.26 ‘g’ stands for ‘gon’
- 1.27 ‘g’ stands for ‘guantao’
- 1.28 ‘g’ stands for ‘galactic’
check full info on github
Enjoy!
11 Jan 2020
In the previous posts on the series about gRPC, we have seen how to build a simple gRPC request/reply service and a gRPC server streaming service by using .NET Core and the new grpc-dotnet, the managed library entirely written in C#. Now it’s the time to create and build a .NET gRPC client. And it’s really easy to do.
First of all, we need to create a client project. For the purpose of this article, a simple console project will be enough. So, you can open the terminal, go to your preferred folder and execute the following command:
dotnet new console -o GrpcClient
Then go to the folder just created and add the necessary reference with the following commands:
dotnet add package Google.Protobuf
dotnet add package Grpc.Net.Client
dotnet add package Grpc.Tools
Now, we can create the bookshelf.proto file (full code available on my github repository:
syntax = "proto3";

option csharp_namespace = "BookshelfService";

package BookshelfService;

// The bookshelf service definition.
service BookService {
  // Get full list of books
  rpc GetAllBooks (AllBooksRequest) returns (stream AllBooksReply);
  // Save a Book
  rpc Save (NewBookRequest) returns (NewBookReply);
}

// The request message containing the book's title and description.
message AllBooksRequest {
  int32 itemsPerPage = 1;
}

// The request message containing the book's title and description.
message AllBooksReply {
  repeated Book Books = 1;
}

message Book {
  string title = 1;
  string description = 2;
}

// The request message containing the book's title and description.
message NewBookRequest {
  string title = 1;
  string description = 2;
}

// The response message containing the book id.
message NewBookReply {
  string id = 1;
}
We can then add the just created file to the project by using dotnet-grpc CLI. If you haven’t installed yet, execute the following command:
dotnet tool install -g dotnet-grpc
then add the bookshelf.proto to the client project:
dotnet grpc add-file bookshelf.proto --services Client
Finally, be sure to set the right GrpcService value of the Protobuf element in your .csproj file:
You can set the GrpcService attribute to decide the kind of grpc generated code. The accepted values are: Both, Client, Default, None, Server.
<ItemGroup>
  <Protobuf Include="..\Protos\bookshelf.proto" GrpcServices="Client" />
</ItemGroup>
Let’s start coding
Calling a Grpc Service is a very simple operation. Just create the channel, connect to the service endpoint, and then pass it to the generated client as a constructor parameter. Now you can use the client instance to invoke the service methods:
using (var channel = GrpcChannel.ForAddress("http://localhost:5000"))
{
    var request = new NewBookRequest();
    request.Title = "1984";
    request.Description = "A George Orwell novel";

    var client =  new BookService.BookServiceClient(channel);
    client.Save(request);
}
NOTE: if you are on macOs, HTTP/2 on TLS is still not supported, so you need to deactivate it by using the following instruction before connect to the service: AppContext.SetSwitch("System.Net.Http.SocketsHttpHandler.Http2UnencryptedSupport", true);
Enjoy!
check full code on github
15 Dec 2019
In the first post of this .NET Core gRPC services, we have seen how to build a simple request-reply service by using .NET Core 3 and the brand new grpc-dotnet library entirely written in C#.
Now, it’s time to extend our scenario by exploring the next kind of service: server streaming.
NOTE: Remember that gRPC offers four kinds of service: request-reply, server streaming, client streaming, and bidirectional streaming. We’ll see the others in dedicated posts
Server Streaming Scenarios
First of all, what is server streaming? This is an excerpt the gRPC site:
Server streaming RPCs where the client sends a request to the server and gets a stream to read a sequence of messages back. The client reads from the returned stream until there are no more messages. gRPC guarantees message ordering within an individual RPC call.
Typically, server streaming may be useful when you have a set of data that needs to be continuously send to the client while the server is still working on that. Let me explain with some example: imagine you need to send back a list of items. Instead of sending a full list, with bad performance, you can send back a block of n items per message, allowing the client start its operations asynchronously. This is a very basic usage of server streaming.
Ok, now we can start coding
Based on the BookshelfService implemented in the previous post and available on my github repository, we must update the bookshelf.proto by adding a new service called GetAllBooks and the related AllBooksRequest and AllBooksReply. That service will return the full list of books from our shelf:
// The bookshelf service definition
service BookService {
  // Get full list of books
  rpc GetAllBooks (AllBooksRequest) returns (stream AllBooksReply);
}

// The Request message containing specific parameters
message AllBooksRequest {
  int32 itemsPerPage = 1;
}

// The Reply message containing the book list
message AllBooksReply {
  repeated Book Books = 1;
}

// The Book message represents a book instance
message Book {
  string title = 1;
  string description = 2;
}
After changing the .proto file, now you’ll be able to override the GetAllBooks method in the BookshelfService class to implement the server-side logic:
public override async Task GetAllBooks(AllBooksRequest request, IServerStreamWriter<AllBooksReply> responseStream, ServerCallContext context)
{
    var pageIndex = 0;
    while (!context.CancellationToken.IsCancellationRequested)
    {
        var books = BooksManager.ReadAll(++pageIndex, request.ItemsPerPage);
        if (!books.Any())
        {
            break;
        }

        var reply = new AllBooksReply();
        reply.Books.AddRange(books);
        await responseStream.WriteAsync(reply);
    }
}
Finally, we can run the service with the dotnet run command and test it with BloomRPC:
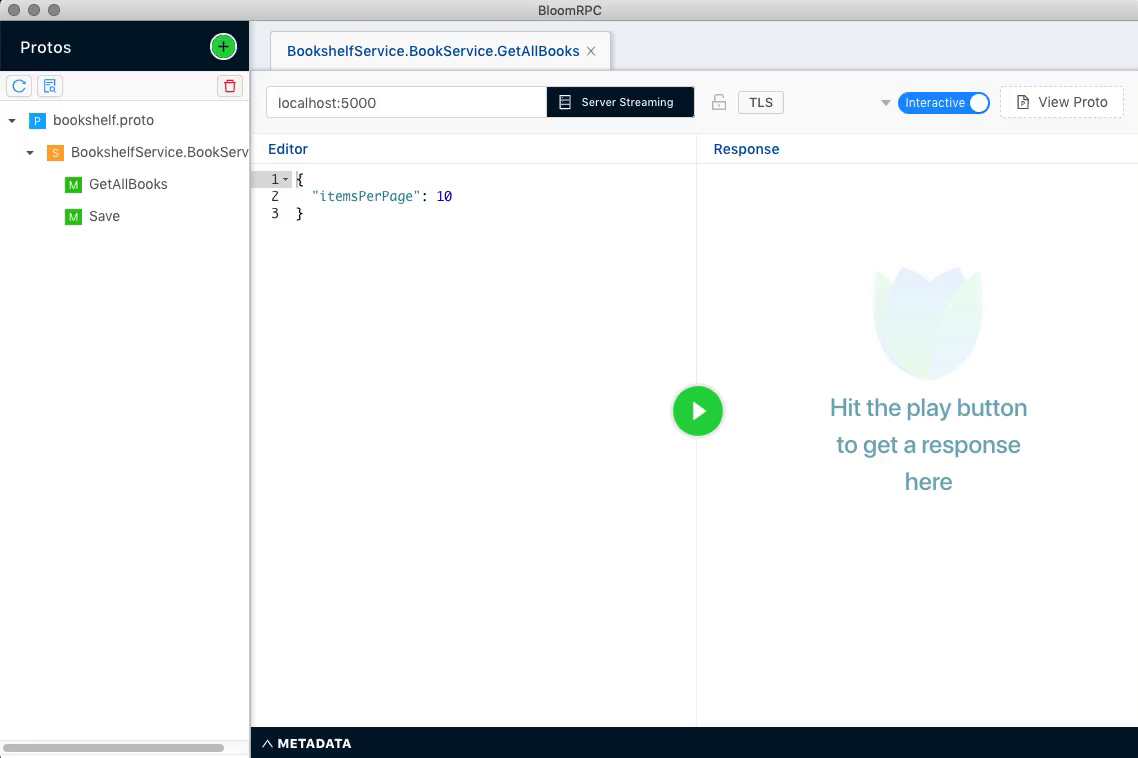
In the next post we’ll see how to create the client for the server streaming service type.
Enjoy!
check full code on github
03 Dec 2019
If you are working with .NET Core on MacOS, you’ll probably get the following exception:
System.NotSupportedException: HTTP/2 over TLS is not supported on macOS due to missing ALPN support.
This happens because at the moment Kestrel doesn’t support HTTP/2 with TLS on macOS and older Windows versions such as Windows 7. To work around this issue, you have to disable TLS. Open your Program.cs file and update the CreateHostBuilder with the following lines:
public static IHostBuilder CreateHostBuilder(string[] args) =>
    Host.CreateDefaultBuilder(args)
        .ConfigureWebHostDefaults(webBuilder =>
        {
            webBuilder.ConfigureKestrel(options =>
            {
                options.ListenLocalhost(5000, o => o.Protocols = HttpProtocols.Http2);
            });
            webBuilder.UseStartup<Startup>();
        });
That’s it! Now you can execute dotnet run command to start your gRPC service.
Enjoy!
15 Nov 2019
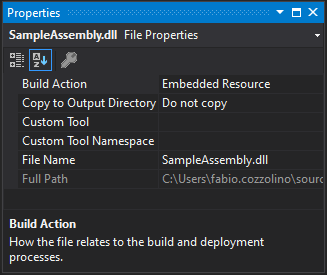
Sometimes, when your assembly has many dependencies, you may have the need to simplify deployment. One useful approach is to embed dependent assembly into the main one. To proceed, you need to add the assembly as embedded resource into your project:
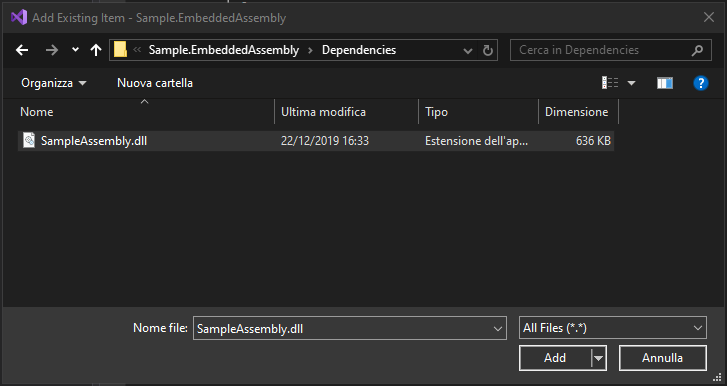
Then set the assembly as Embedded Resource:
Finally, the code is very simple. Subscribe to the AssemblyResolve event. That event is fired when the common language runtime is unable to locate and bind the requested assembly:
AppDomain.CurrentDomain.AssemblyResolve += new ResolveEventHandler(CurrentDomain_AssemblyResolve);
Then, you must implement the event handler, read the assembly from resources and call the Assembly.Load method to load it:
private Assembly CurrentDomain_AssemblyResolve(object sender, ResolveEventArgs args)
{
    string assemblyName = args.Name.Split(',').First();
    string assemblyFolder = "Resources";
    string assemblyEmbeddedName = string.Format("{0}.{1}.{2}.dll",
        this.GetType().Namespace, assemblyFolder, assemblyName);

    Assembly currentAssembly = Assembly.GetExecutingAssembly();
    using (var stream = currentAssembly.GetManifestResourceStream(assemblyEmbeddedName))
    {
        if (stream == null)
        {
            return null;
        }

        var buffer = new byte[(int)stream.Length];
        stream.Read(buffer, 0, (int)stream.Length);
        return Assembly.Load(buffer);
    }
}
The above code assumes that the assembly are stored in a folder named Resources and the base namespace is the same of the current type.
Conclusion
At the end, we can analyze the pros and cons of this approach:
- Pros
- Reduced set of assemblies to deploy is the main reason that could suggest you to embed it in your assembly
- Cons
- Dependent assemblies needs to be manually updated when new release are available
This is a very simple way to read embedded assemblies. Be careful, use this approach only if it is really necessary.
Enjoy!